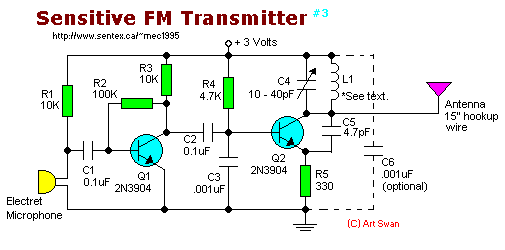
Parts List:

R1,R3 = 10K       C1,C2 = 0.1uF      Q1,Q2 = 2N3904
   R2 = 100K         C3 = 0.001uF       L1 = see text
   R4 = 4.7K         C4 = 10-40pF
   R5 = 330 ohm      C5 = 4.7pF
Construction:
L1 is 0.1uH, 6 to 8 turns of 22-gauge hookup wire close wound around a 1/4-inch diameter non-conductive core such as
a pencil.
The default for the capacitors type is ceramic, preferably the npo 1% type or equivalent. But basically nothing critical
here. Use any capacitor you have laying around, but no electrolytic or tantalum caps. Only if you intend to use this
circuit outside the home you may want to select more temperature stable capacitors like polyester types. Again, don't
go out of your way to buy stuff, use what ever you can salvage.
If you decide to substitute transistors with something similar you already have, it maybe necessary adjust the collector
voltage of Q1 by changing the value of R2 or R3 (because you change transistors, it changes this bias on the base of Q1).
It should be about 1/2 the supply voltage (about 4 or 5v).
To find the signal on your receiver, make sure there is a signal coming into the microphone, otherwise the circuit won't
work. I use an old mechanical alarm clock (you know, with those two large bells on it). I put this clock by the microphone
which picks up the loud tick-tock. I'm sure you get the idea... Or you can just lightly tap the microphone while
searching for the location of the signal on your receiver.
Back to Circuits page