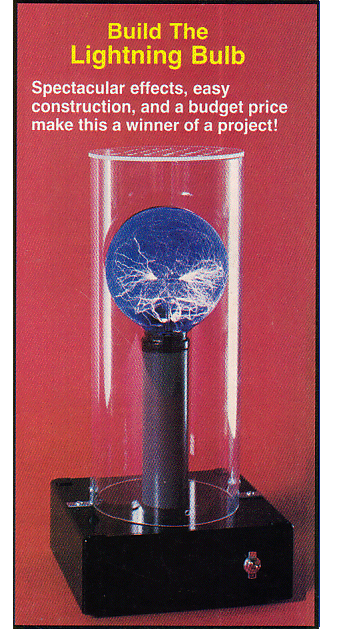
"Create an electrical storm in a light bulb with this easy-to-build project."
by Vinny Vollono
Since the dawn of civilization, mankind has been fascinated by lightning. And it was that fascination with
lightning and electricity that has brought about many of the high-tech novelty items--like the Tesla Coil, Eye of the
Storm, Jacob's Ladder, and the Van de Graaff generator, for example--that are showing up in the market place.
Similar effects can be produced by the Lightning Bulb, which creates a stunning display, yet consists of little
more than a modified clear incandescent lamp and a high-voltage power supply. The lamp is modified by taping a piece
of aluminum foil to the back half of its glass envelope, forming a sort of makeshift capacitor. The electrode inside
the lamp forms one plate of the capacitor, the glass envelope of the lamp serves as the dielectric, and the aluminum
foil is used as the second plate.
The aluminum foil, like the negative plate of a polarized electrolytic capacitor, is grounded. A high voltage is
discharged into the lamp through its inner electrode, ionizing the thin gas that remains in the envelope, creating a
visual effect similar to an electrical storm.
 Circuit Description:
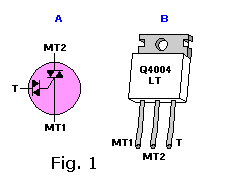
The Lightning Bulb circuit uses a quadrac (see Fig. 1)--a device that combines a triac and
a diac trigger in a single package--to control the supplied current. Figure 1A shows the schematic symbol for the
quadrac, while figure 1B shows the pinout for the unit used in our circuit. Note that quadracs are increasingly
difficult to come by; if one can not be located, a discrete triac/diac combination of equal or higher rating can be used
in its place.
Figure 2 shows a schematic diagram of the Lightning Bulb circuit. The heart of the circuit
is a 12-volt automotive ignition coil, T1, which is used to deliver a high-voltage charge of sufficient magnitude to
ionize the gases within the glass envelope of lamp I1.
Power for the circuit is taken directly from the AC line and applied through a phase-shift network (consisting of
capacitor C1 and resistor R1) to the trigger input (T) of the quadrac TR1, causing it to conduct.
With TR1 conducting, a short burst of energy is applied via C2 to the primary winding of T1. (Recall that when power is
first applied to a capacitor, the capacitor acts as a short, and then the capacitor begins to charge to the applied
voltage.) That burst of energy creates a magnetic filed around the primary winding of T1, causing a high-voltage to be
induced in its secondary.
When capacitor C2 begins to charge to its highest level, the AC signal collapses, the current needed to maintain triac
conduction dips below the holding level (IH), the triac turns off, and the second half of the AC signal
begins.
As the AC signal becomes more negative, a signal is again applied to the triac's trigger input, causing it to conduct.
Triacs conduct during both he positive and negative half cycles of an AC waveform, and can be activated by either a
positive of negative trigger source.
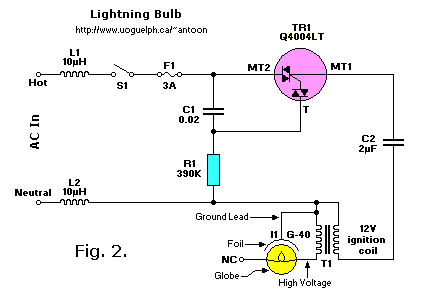 With TR1 now conducting in the opposite direction, the charge on C2 is bled off, via TR1, and a burst of energy
(of opposite polarity) is applied to the primary winding of T1, causing a voltage to be induced in its secondary
winding. The high-voltage output (about 20,000 volts) at the secondary of T1 is applied to the lamp, I1, creating an
electrical storm-like effect.
With TR1 now conducting in the opposite direction, the charge on C2 is bled off, via TR1, and a burst of energy
(of opposite polarity) is applied to the primary winding of T1, causing a voltage to be induced in its secondary
winding. The high-voltage output (about 20,000 volts) at the secondary of T1 is applied to the lamp, I1, creating an
electrical storm-like effect.
The value of C2 must be limited to between 2-2.5 uF to prevent damage to ignition coil T1. On the other hand, if the
value of C2 is too small, the display will be somewhat insufficiently pronounced. Inductors L1 and L2 were added to
block any switching transients from entering the AC line.
Safety First:
As shown in the schematic diagram (Fig. 2) you'll be dealing with a high-voltage transformerless power source.
Because of the possible safety hazard associated with projects of this type, it is strongly recommended that you use
and isolation transformer (1:1) when testing and troubleshooting the circuit. For an extra margin of safety, always
be sure to discharge the capacitors before performing any work on the circuit. A capacitor can store a charge large
enough to melt a copper penny.
 Caution: In assembling the Lightning Bulb, do not omit the protective
plexiglass tube that covers the lamp. The clear 1/8-inch thick plexiglass tube helps to prevent an accidental shock.
The high voltage can penetrate the glass and you could get a shock or worse. The safety cover is an absolute must.
Caution: In assembling the Lightning Bulb, do not omit the protective
plexiglass tube that covers the lamp. The clear 1/8-inch thick plexiglass tube helps to prevent an accidental shock.
The high voltage can penetrate the glass and you could get a shock or worse. The safety cover is an absolute must.
Construction:
Because of the simplicity of the circuit, the author's prototype was built on a piece of perfboard (measuring about
3 by 4 inches), and the connection between the components were made using point-to-point wiring. Printed Circuit
Board construction will not be discussed in this article.
Assemble the circuit board using Fig. 2 as a wiring guide, making the interconnections between the components as the
components are installed on the board. Just about any 12-volt automobile ignition coil should do for T1. the .02uF
capacitor specified for C1 can be replaced by two 0.01uF units connected in parallel, which is what the author used
in his prototype.
When the circuit-board assembly is complete, set it aside for a while and begin modifying the lamp. The lamp used in
the author's prototype is a 25-watt designer's bulb with a 5-inch clear-glass envelope.
 Contrary to common belief,
the area within the envelope--particularly where larger envelopes are concerned--is not a total vacuum. Some gas still
remains with in the envelope even after the evacuation process.
Lamps having large envelopes produce a more impressive display because of the higher concentration of gas (in
comparison to standard household lamps) within the envelope.
Contrary to common belief,
the area within the envelope--particularly where larger envelopes are concerned--is not a total vacuum. Some gas still
remains with in the envelope even after the evacuation process.
Lamps having large envelopes produce a more impressive display because of the higher concentration of gas (in
comparison to standard household lamps) within the envelope.
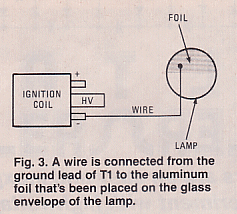
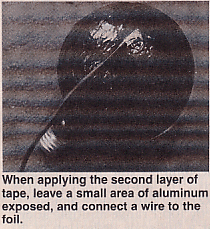
Start the modification process by placing black electrical tape on what will be the back half of the lamp. Place a
layer of aluminum foil over the tape and then add a second layer of tape over the aluminum foil to hold it in place.
Starting from the outer edges of the foil, apply the tape, working your way inward toward the center. Leave a small
portion of the foil exposed so that a wire can be attached. The author used aluminum solder to attach a lead to
the aluminum foil, but gluing or taping should work. Once the wire is attached, it should be connected to the ground
terminal of T1 as shown in Fig. 3. Then cover the exposed aluminum and the wire with tape.
The author used a regular plug-in lamp socket to connect the lamp to the high-voltage output of T1. A high-voltage
cable is connected across the two contacts of the lamp socket. The type of lead wire used in TV sets to bridge the
high-voltage output of the flyback transformer to the anode of the CRT is ideal.
Once the wires to the lamp are in place, mount the lamps and socket to their support column. It's a good idea to
devise some sort of identification method for the leads; that will cut down on the confusion that may arise during
the final electrical assembly process.
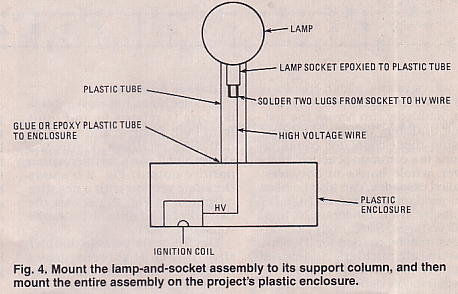
The lamp-support column is a 5- to 6-inch length of plastic tubing with an outside diameter (OD) of 1-1/2 inches.
After threading the wires from the lamp-and-socket assembly though the tube, secure the lamp-and-socket assembly to
the tube with glue or epoxy. (see Fig. 4.) Once the glue has dried, re-enforce the assembly where the lamp-and-socket
assembly meets the support column with one of two wraps of tape.
The support-column assembly is then secured to the project box with glue, or is held in place with screws and "L"
brackets. The two leads from the lamp are then connected to the circuit-board mounted components.
The "hot" side of T1's secondary is connected to the bridged lamp-socket terminals (as shown in Fig. 4), and the
negative side is connected to the lead coming from the aluminum plate on the lamp. Feed a line cord through the
enclosure wall to the circuit board. Connect one lead from the line cord directly to the circuit board. The other
lead is then connected through S1 to the circuit board.
 Once that is done, check your work. If everything looks okay, seal the board in its enclosure and place a 6-inch OD
plexiglass tube over the lamp and column assembly. (The actual length of the protective tubing depends on the physical
height of the lamp/support-column combination). The tube provides the user with some measure of protection from high
voltage that's present in the circuit.
Once that is done, check your work. If everything looks okay, seal the board in its enclosure and place a 6-inch OD
plexiglass tube over the lamp and column assembly. (The actual length of the protective tubing depends on the physical
height of the lamp/support-column combination). The tube provides the user with some measure of protection from high
voltage that's present in the circuit.
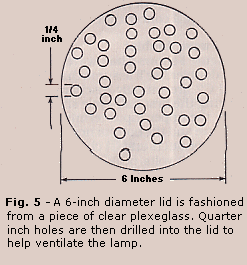
The 6-inch tube can be secured in place with 1/2-inch wide angle brackets. (See photos). A lid for the tube can be
fashioned from a piece of clear plexiglass. Holes, about 1/4-inch in diameter, should be drilled in the lid for
ventilation. The lid can then be glued to the top of the protective tube.
You are now all set to give your Lightning Bulb a test run. As with all other projects of a similar nature, ambient
light detracts from the visual effect of the display. The Lightning Bulb gives a much more impressive display in a
dark room.
Parts List
   U1 = Q4004LT, 4A/400V Quadrac, or triac/diac combination (see text)
   C1 = 0.02uF, metal film capacitor
   C2 = 2uF, 400WVDC, metalized polyester or polycarbonate capacitor
   F1 = 3 amp 3AG fuse
   I1 = G-40 clear incandescent lamp with 5-inch envelope
L1,L2 = 10uH hash choke
   R1 = 390K, 1/2 watt
   S1 = Single pole, single throw (SPST) toggle switch
   T1 = 12 volt automotive ignition coil.
Perfboard materials or printed circuit board, plastic enclosure, 6-inch OD
plexiglass tube, 1-1/2 inch OD plexiglass tube, high voltage cable, fuse holder,
aluminum foil, electrical tape, wire, solder, hardware, etc.
Copyright and Credits:
The author and owner of the original project is Vinny Vollono and published by Gernsback. Gernsback Publishing is out
of business. Copyright Vinny Vollono, 1992. All photographs, drawings, schematics, redrawn by Tony van Roon.
Editor's note and Disclaimer: The device carries lethal high voltage and
carelessness can be dangerous to your health. Build and/or use at your own risk. The Sentex Corporation of Cambridge
Ontario, host of "Tony's Website", or Tony van Roon himself, cannot be held liable or responsible or will accept any
type of liability in any event, in case of injury or even death by building and/or using or misuse of this device or
any other high-voltage device posted on this web site. By accessing, reading, printing, or building the unit in this
article you agree to be solely responsible and agree with the above stated disclaimer.
Back to High Voltage Projects Index
Page Copyright © 2001 - Tony van Roon