"High-Voltage Zappers"
"It doesn't take much to generate enough high-voltage to curl your hair."
by Charles D. Rakes
Rewritten by Tony van Roon (VA3AVR)
The two circuits listed here are for the experimenter having a touch of
Ben and Nikola's fascination for working with high-voltage. But unlike those two brave pioneers who flirted with
lightning and gigantic spark coils, our high-voltage circuits are mild in comparison, having outputs of less than
50 kilovolts (KV). Even so, don't ever become careless when working with high voltage. To do so could be dangerous
to your health and your good nature. So please take care.
A circuit that generates a high voltage by discharging the energy stored in a large-value capacitor through the primary
winding of a high-turns-ratio step-up transformer is known a a Capacitor-Discharge (CD) system. It's the
same concept used by many of the high-performance auto-ignition systems to produce a super-hot spark. It's also the
same kind of system used by some of the top-of-the-line electric fence chargers. And let us not forget one of the
most popular persona-defense devices now on the market, the electronic Stun-Gun, which also generates its zap with
capacitor-discharge circuit.
 How we make the Zap
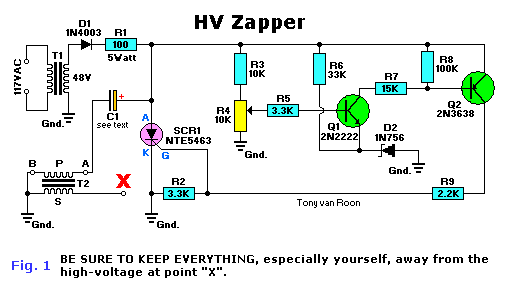
As shown in the circuit of Fig. 1, step-down transformer T1 drops the incoming line
voltage to approximately 48 VAC and, in the process, adds a degree of safety through the transformer's
primary-to-secondary isolation from the power line. T1's 48-volt secondary is rectified by diode D1; the resulting DC
chargers capacitor C1, through current-limiter R1, to a voltage level pre-set by R4. When the voltage on R4's wiper
reaches about 8.6 volts, Q1 begins to turn on, drawing current through R7 and the base-emitter junction of Q2. Then
Q2 turns on and supplies a positive voltage on the gate of silicon-controlled rectifier Q3. The positive gate voltage
causes Q3 to conduct, thereby discharging C1 through the primary winding of step-up transformer T2; the end result is
a high-voltage arc at the output terminal (X).
The value of the high voltage developed at T2's output is determined by the value of C1, the voltage across C1, and the
turns ratio of T2. The frequency or pulse rate of the high voltage is determined by the resistance of T1's primary
and secondary windings, the value of R1, and the value of C1. The lower the value of each item, the higher the output
pulse rate; the peak output voltage will remain unchanged only if C1's value remains unchanged.
Parts List, Fig. 1
All resistors are 1/2-watt, 5%, unless otherwise noted
   R1 = 100 ohms, 5 watts, brown-black-brown
R2,R5 = 3K3 (3.3K), orange-orange-red
   R3 = 10K, brown-black-orange
   R4 = 10K, potentiometer
   R6 = 33K, orange-orange-orange
   R7 = 15K, brown-green-orange
   R8 = 100K, brown-black-yellow
   R9 = 2K2 (2.2K), red-red-red

Capacitors
C1 = 220 or 440uF, 75-100 volts, electrolytic,
     or 10uF 220VAC motor capacitor (see text)

Semiconductors
  D1 = 1N4003, silicon rectifier
  D2 = 1N756, 8 volt zener diode
  Q1 = 2N2222, NPN transistor
  Q2 = 2N3638, PNP transistor
SCR1 = NTE5463, 10-amp, 200 volt, silicon-controlled rectifier (SCR)

Other Components
T1 = Step-down transformer, 48VAC, 300mA
T2 = Auto ignition coil, or substitute (see text)
Building the CD System
The circuit shown in Fig. 1 is non-critical, so any parts layout and mounting can be used;
perfboard wiring board will probably make for the easiest assembly. But no matter what kind of construction is used,
keep T2's output terminal (labeled X) at least 3 inches clear of all circuit
components, yourself, and anything else that can conduct electricity.
The transformer used for T2 can be almost any 6- or 12V auto-ignition coil, but one designed with a high turns ratio
for a capacitor-discharge ignition system will produce the greatest output voltage. The CD coil that we used
produced a spark 1-1/4 inches in length from the output terminal to the coil's common terminal.
An old (but good) TV flyback transformer can also be used for T2. Simply wind about 10 turns of test-lead wire around
the transformer's ferrite core and connect the free ends of the wires to the points labeled "A" and "B" in Fig. 1.
Some experimenting with the number of turns may be necessary to obtains good results with that type of transformer.
Our experiments with the TV flyback produced a voltage that would jump a 3/4 inch gap.
If a small-engine repair business is located in your area, see if the owner or mechanic will give you a few of the old
ignition coils. If you obtain several old coils, one of more should be unusable. To produce a high voltage with a
small-engine ignition coil, connect the primary leads to terminals "A" and "B", and a 1/2 to 3/4 inch spark should
be possible.
To make a "magnetic charger", select one of the ignition coils that has a good primary winding and carefully remove
the secondary winding from the coil's core. Connect the primary to terminals "A" and "B". Position any object that
you want to magnetize on the exposed core laminations and apply power; you should hear a "Zap" sound as the magnetic
pulses hit the metal object.
Maximum Spark
If you want to achieve a maximum spark, select a CD ignition coil, and use a 440uF, 75-100WVDC electrolytic capacitor
for C1. Using a DC voltmeter, monitor the voltage across C1. Adjust R4 so that the Q3 fires when the charging voltage
across C1 reaches between 50-55 volts. That setting should produce a spark 1-1/4 to 1-1/2 inches long every second or
so.
To obtains a faster pulse rate, with some reduction in the output, change C1 to a 10uF, 220VAC motor capacitor
(or any other lower value with a rating of 75 volts or more). Experiment with different component values to obtain
the desired results.
An excellent electric fence charger can be made by building the CD circuit in a suitable case and selecting a 220uF
capacitor for C1. Adjust R4 for one to two pulses per second.
Battery-powered High Voltage
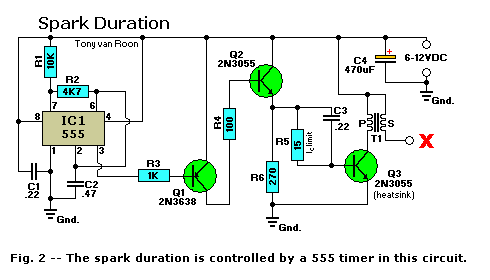
A high-voltage generator circuit that can operate from a battery or other low-voltage DC source is shown in
Fig. 2.
Output voltage great enough to jump a 1-inch gap can be obtained from a 12-volt power source, and with a higher pulse
rate that the circuit in Fig. 2.
A 555 timer IC is connected as an astable multivibrator that produces a narrow negative pulse at pin 3. The pulse
turns Q1 on for the duration of the time period. The collector of Q1 is direct-coupled to the base of power
transistor Q2, turning it on during the same time period.
The emitter of Q2 is direct-coupled through current-limiter R5 to the base of power-transistor Q3. When Q3 turns on,
there is a minimum resistance between its collector and emitter. That causes a high-current pulse through the
primary of T1, which generates a very high pulse voltage at T1's secondary output terminal (labeled
(X). The pulse frequency is determined by the values of R1, R2, and C2. The values given in the Parts
List were chosen to give the best possible performance when an auto ignition co8ild is used for T1. Here too, a
CD-type ignition coil will produce the greatest output voltage.
Performance wiring board construction is a good choice for this circuit, but remember to be careful when working near
the output terminal of T1 while the power is on.
Parts List, Fig. 2
All resistors are 1/2-watt, 5%, unless otherwise noted
R1 = 10K, brown-black-orange
R2 = 4.7K, yellow-purple-red
R3 = 1K, brown-black-red
R4 = 100 ohms, brown-black-brown
R5 = 15 ohms, 5 watts, wire-wound
R6 = 270 ohms, red-purple-brown

Capacitors
C1,C3 = 0.22uF, 100 volts, Mylar
   C2 = 0.47uF, 100 volts, Mylar
   C4 = 470uF, 25 volts, electrolytic

Semiconductors
IC1 = 555 timer (not the CMOS type)
 Q1 = 2N3638, or NTE129, PNP transistor
 Q2 = 2N3055, or NTE130, NPN power transistor
 Q3 = 2N3055, or NTE130, NPN power transistor with heatsink

Other Components
T1 = Auto ignition coil (see text)
Copyright and credits:
This article originally was written by Charles D. Rakes and the editors of "Electronics Now" and "Popular
Electronics" magazines and published by Gernsback Publishing, 1992 (Gernsback Publishing is no longer in business).
Editor's note and Disclaimer:
This device is presented here for educational and experimental purposes only as part of our High-Voltage Projects.
Build and/or use at your own risk. The Sentex Corporation of Cambridge Ontario, host of "Tony's Website", or Tony
van Roon himself, cannot be held liable or responsible or will accept any type of liability in any event, in case
of injury or even death by building and/or using or misuse of this device or any other high-voltage device posted
on this web site. By accessing, reading, and/or printing this article you agree to be solely responsible as stated
in the above disclaimer.
Back to High Voltage Projects Index
Copyright © 2005 - Tony van Roon