Bench
Top Powersupply -- Part 2
© Tony van Roon, VA3AVR
"In this second part of the Bench Top Power Supply
project we will cover the construction, assembly, and wiring of the large coolrib and the optional Automatic Fan
Control circuit. When that is done the transformer T1, 115VAC components, large capacitor C3, and the bridge
rectifier will be installed and wired up. There are lots of pictures and photos to help you out. Main thing to
remember is to TAKE-IT-EASY, read the explanations and take your time. This is definitely a NO rush job."
The Large Coolrib:
Building the large coolrib was a lot of fun. I found an old coolrib in one of my parts boxes which measured about
11" x 4-1/8" (28 x 10.5cm) which is perfect because it fitted the back of the Hammond Instrument Case perfectly with
room to spare for the AC-side (see photo). The Hammond Instrument Case is not cheap, but is a ventilated, low-profile,
series 1426V type with dimensions of about 12x8x4 inches. Make sure YOUR transformer fits your instrument case!
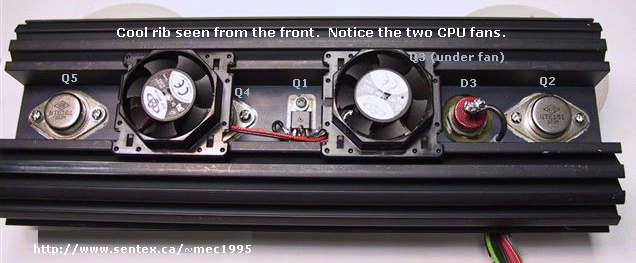
Looking at the photo above, it shows the large coolrib with the two cpu fans. Since that picture was taken I
have upgraded to three ball-bearing cpu fans which have more blades and run quieter. They also are of a different
model and required a bit of tinkering to mount them on the coolrib without drilling more holes. But that's the fun part
of it, making things fit and work. I didn't say building this power supply was easy, well, what I mean by that is that
 some stuff needs to be modified in order to use it. I mounted the fans in such a way so they blow the cool air over the
semiconductors and the coolrib instead of sucking the hot air away from it.
some stuff needs to be modified in order to use it. I mounted the fans in such a way so they blow the cool air over the
semiconductors and the coolrib instead of sucking the hot air away from it.
Try to do a good job on the coolrib, it'll pay later down the road. I mention this because we are not all Tool-and-Die
mechanics and for some of us this can be a real chore. But don't worry, just take your time and you get it done. It
took me almost a week on and off. A lot of wires need to be hooked up and so that takes time.
 Before starting to mount the transistors and power diode D3, make sure all the holes are drilled. Take a large drill bit
and remove the burrs. (Tony's note: D3 has been upgraded to a TO-200 model @ 20A in early 2009)
Including several extra holes to feed the wires through from D3, the transistors and a spare just
in case. Once everything is wired and bolted together it is pretty hard to drill any hole anywhere. I'm not inclined
to give drill bit #'s and hole sizes at this time. Just make sure the holes are large enough to snug-fit the plastic
hole-insulators.
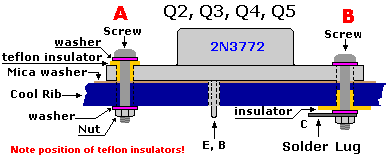
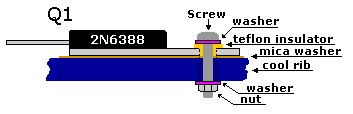
Mount the TO-3 power 2N3772 (or NTE181) transistors, Q2, Q3, Q4, and Q5. Use silicon heatsink
compound on all semiconductors mounted on the coolrib, between coolrib, mica-washer, and transistor. Use insulators
to screw down the transistors. Use the photo's and drawings as a guide if you are not familiar with this method.
That done, mount the TO-220 transistor Q1 (2N6388 in my case). Again, make sure it is mounted insulated.
Before starting to mount the transistors and power diode D3, make sure all the holes are drilled. Take a large drill bit
and remove the burrs. (Tony's note: D3 has been upgraded to a TO-200 model @ 20A in early 2009)
Including several extra holes to feed the wires through from D3, the transistors and a spare just
in case. Once everything is wired and bolted together it is pretty hard to drill any hole anywhere. I'm not inclined
to give drill bit #'s and hole sizes at this time. Just make sure the holes are large enough to snug-fit the plastic
hole-insulators.
Mount the TO-3 power 2N3772 (or NTE181) transistors, Q2, Q3, Q4, and Q5. Use silicon heatsink
compound on all semiconductors mounted on the coolrib, between coolrib, mica-washer, and transistor. Use insulators
to screw down the transistors. Use the photo's and drawings as a guide if you are not familiar with this method.
That done, mount the TO-220 transistor Q1 (2N6388 in my case). Again, make sure it is mounted insulated.
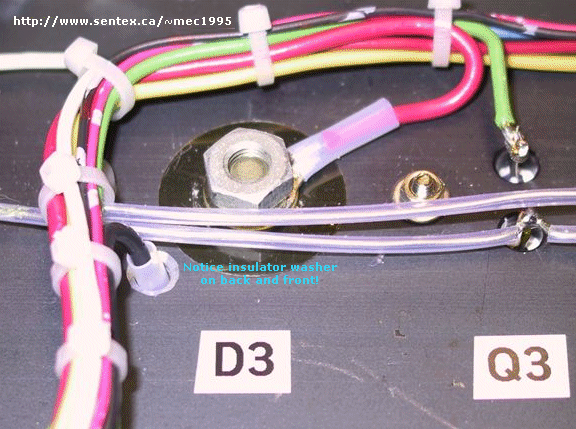
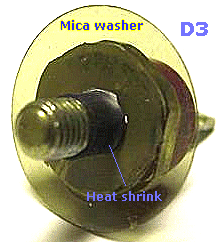
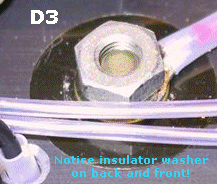
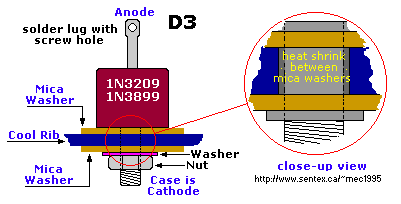 Power diode D3, needs some pre-work if you use the stud-mounted
model, like I did. The two mica washers and heat-shrink tubing makes sure that this component also is
insulated from the coolrib (see pictures). Note again that D3 uses mica washers on each side of the coolrib and a
bit of heat shrink tubing in between, the size of the thickness of the coolrib, to prevent the stud from touching the
coolrib via the inside of the mounting hole. You need to drill the hole a little bigger to account for the extra
thickness of the heat shrink tubing. Shrink the heat-shrink with a hairdryer or something to make it a sturdy fit.
Try to make it a good fit as possible inside the mounting hole but not tight. Meaning, after you drill the two holes
for D3, one for the stud-mount, the other to feed the wire through, check if the diode with the heat shrink fits the
hole. If not, don't use force and drill it a little larger or use a small round file. Remove all the burrs from the
holes with a large oversized drill to prevent shorts. The nut of D3 faces towards the back.
DO NOT OVERTIGHTEN D3 (studmount version)!
Power diode D3, needs some pre-work if you use the stud-mounted
model, like I did. The two mica washers and heat-shrink tubing makes sure that this component also is
insulated from the coolrib (see pictures). Note again that D3 uses mica washers on each side of the coolrib and a
bit of heat shrink tubing in between, the size of the thickness of the coolrib, to prevent the stud from touching the
coolrib via the inside of the mounting hole. You need to drill the hole a little bigger to account for the extra
thickness of the heat shrink tubing. Shrink the heat-shrink with a hairdryer or something to make it a sturdy fit.
Try to make it a good fit as possible inside the mounting hole but not tight. Meaning, after you drill the two holes
for D3, one for the stud-mount, the other to feed the wire through, check if the diode with the heat shrink fits the
hole. If not, don't use force and drill it a little larger or use a small round file. Remove all the burrs from the
holes with a large oversized drill to prevent shorts. The nut of D3 faces towards the back.
DO NOT OVERTIGHTEN D3 (studmount version)!

I left the photo's pretty large so you can have a better look. For good heat transfer from the semiconductors to the
coolrib, use silicon heat-sink compound/paste of some sort. They come in clear and white colors. Use it also on the power
diode d3.
When all semiconductors are mounted, and BEFORE starting to wire the whole thing up to the circuit board,
take your continuity tester or multimeter and verify that the body of all transistors (Q1 t Q5) and the stud of D3 are
insulated from the coolrib and each other, meaning NO continuity on all of them. One probe on the coolrib and
with the other you check the case of all (collector) of all semiconductors. If all is well, proceed, if not and you
notice continuity somewhere it means that that part is not insulated properly. Fix that first before continuing!
Click on the D3 photo's for a full-size view.
Making a good and solid Printed Circuit Board will have its own awards. The trimmer pots for
'voltage' and 'current' adjustments are logically grouped together for neatness and ease of use. Use thick wire to
connect the collectors of Q2 to Q5 to the positive of C3. By full scale in the 10 amp setting there is 10 amps going
through. Thick wire is mandatory or it will burn. Do the same for the wire going from the minus of C3 to the
common ground connection on the pcb (see lay-out). From this point to the output jack-posts, thick wire also. Make sure
large capacitor C3 is mounted isolated from the case or else, because of large currents, weird things may happen
inside the case. C5 and C6 must be of the tantalum variety, nothing else!
When you mount the pcb in the case, remove the copper around these screws so the pcb will be isolated from the case.
This method will prevent unwanted spurious ground loops. Please note: New PCB & Lay-out
below. Makes wiring up the PS3010 easy! Unfortunately not included in the KIT version yet.
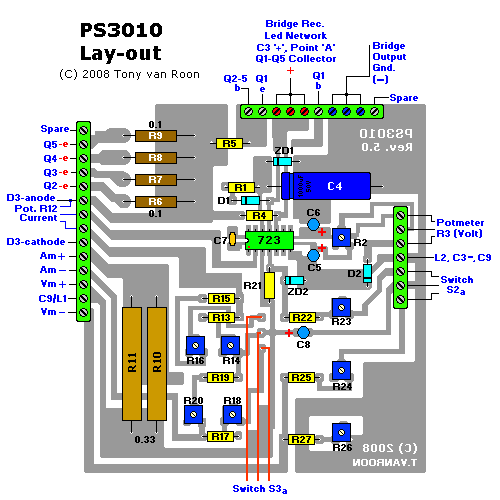
Wire-wound resistors R10 and R11 need to be mounted 'raised' from the pcb because they may get hot and placing them
on ceramic standoffs or something will prevent burning the pcb in that area.
Diode D3 and transistor Q1 are drawn on the layout but are actually mounted on the large coolrib, so take note.
When you are ready to wire up the switches then it is important to know that they are drawn in the 30-volts (S2a) and
10-amps (S3a) positions.
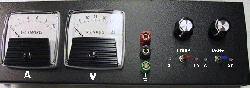
 The Panel Meters:
A big boy like this Jumbo power supply earned to have a set of good panel meters. In the prototype a set of 1-milliamp
full-scale units were used. But I leave it to your own fantasy and creativity how to solve the problem to enhance the
overall cosmetic view of this power supply. As you can see on circuit diagram (Fig. 5, Part 1), both meters have four
switching resistors. Two of them are mounted permanent in series with the measuring system, the other two are
paralleled by means of a switchable section.
You should get panel meters with a very low own current use and on top of that if possible types with 30 or better
still 60 indicator stripes (or markings) on it. A low current usage also means a low internal resistance (Ri)
which will benefit in the area of current measurement of that particular panel meter. We assume that in the low 0 to
1-amp setting there are only small voltages available over R10-R11 and if all goes to plan is the maximum voltage
around 165 millivolt and that is for low-ohm meters feasible. So, try for a model with about 100 millivolt at
full-scale. Which means that a 100 millivolt type only pulls 1 milli-amp at full scale. A 100µA type will
have a Ri of about a 1000 ohm. Check it yourself with Ohm's Law. For the current panel meter try to get a
type with 50 or 100 indicator stripes (or markings).
This is less critical for the 'Volt' unit. Basically you can use any model as long as its own power is not higher
than a couple milli-amps. The internal resistance or Ri is less important since any type of internal resistor
will be removed anyways. Both 7-Segment and digital meters will be added later this year.
To calculate these resistors (R17 to R20 for current, R24 to R27 for voltage), you have to determine your
meter's specifications. And here again, play with Ohm's Law. Point is that in both cases, for current and voltage,
we measure voltage every time. For the measurement of current is
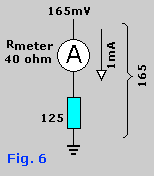
 that 165 millivolt in the 1-amp position and 1.65 volt in the 10 amp position. An example is given to make that
very clear. Imaging we have a unit which at full deflection pulls 1 milli ampere and has an internal resistance of 40
ohms. If we want this unit to measure 165 millivolts then we have to calculate the values as shown in the
Fig. 6. example.
The 165 mV is the voltage, so the current has to be 1 milli-Ampere, using ohm's law
that gives us a total resistance of 165 ohms. This is the total resistance of everything. To get the value of the
shunt resistor just deduct the internal resistance. So, the shunt resistor has to be exactly: 165 - 40 = 125 ohms.
To comfortably be able to adjust the meter's deflection we divide this up in regular resistor of 68 ohm and a trimmer
pot of 100 ohms. The desired value of 125 ohms lays somewhere in between. But we are not done with that. We still have
to take the 1 - 10 Amp setting in consideration because there are already a couple shunt resistors in series with the
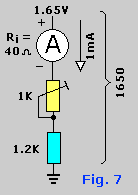
meter and those are the components for the 10 amp scale. Looking at the example in Fig. 7,
we have to measure there 1.65 volt and that means a resistance value of 1650 minus 40 is 1610 ohms. This weird
resistance value can be obtained with a regular 1.2K resistor and a trimmer potentiometer of 1K.
that 165 millivolt in the 1-amp position and 1.65 volt in the 10 amp position. An example is given to make that
very clear. Imaging we have a unit which at full deflection pulls 1 milli ampere and has an internal resistance of 40
ohms. If we want this unit to measure 165 millivolts then we have to calculate the values as shown in the
Fig. 6. example.
The 165 mV is the voltage, so the current has to be 1 milli-Ampere, using ohm's law
that gives us a total resistance of 165 ohms. This is the total resistance of everything. To get the value of the
shunt resistor just deduct the internal resistance. So, the shunt resistor has to be exactly: 165 - 40 = 125 ohms.
To comfortably be able to adjust the meter's deflection we divide this up in regular resistor of 68 ohm and a trimmer
pot of 100 ohms. The desired value of 125 ohms lays somewhere in between. But we are not done with that. We still have
to take the 1 - 10 Amp setting in consideration because there are already a couple shunt resistors in series with the
meter and those are the components for the 10 amp scale. Looking at the example in Fig. 7,
we have to measure there 1.65 volt and that means a resistance value of 1650 minus 40 is 1610 ohms. This weird
resistance value can be obtained with a regular 1.2K resistor and a trimmer potentiometer of 1K.
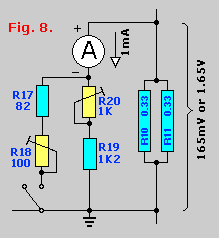
The required value of 125 ohm can be acquired by adding another resistor parallel with the funny 1610 ohm one.
Doing the math (ohm's law), it turns out the value of this parallel
resistor is about 135.5 ohms and that is easily obtainable with a 68 ohm resistor plus a 100 ohm Bourns trimmer
potentiometer. And if you're a perfectionist you can even choose a 82 ohm and a 100 ohm trimmer potentiometer. In the
end you will be getting something as shown in Fig. 8. If you have different types or values
of panel meters, the math is exactly the same. The trimmer pots with do the rest.
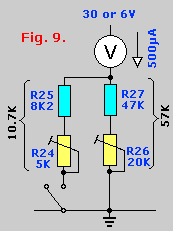
The indication for the Volt-meter is similar. Note that we have taken a 500uA meter as an example!
I mention again, you have to find out the characteristics for the meter YOU are using. (No, I will not do
the math or other calculations, please do it yourself I don't have the time). It is not all that difficult. Simply
assume we're measuring in the 6 and 30 volt ranges which happens to occur with a lot easier resistor values. Let's
say we have a panel meter with an 'internal resistance' of 3000 ohms and that at full-scale it uses about 500uA,
then the shunt resistors are looking like this: for 30 volt the circuit needs a total resistance of 60K, so we need a
57K as shunt which is put together of a regular 47K resistor plus a 20K trimmer potentiometer. For the 6 volt scale
we need a total shunt of about 9K which is put together by putting a 10.7K resistor parallel with a 57K resistor.
Again a strange value but 8.2K plus a 5K trimmer potentiometer will make it work. In Fig. 9
I used, where ever I could, metalfilm resistors instead of the regular carbon type. They are more temperature stable.
But carbon types will work fine.
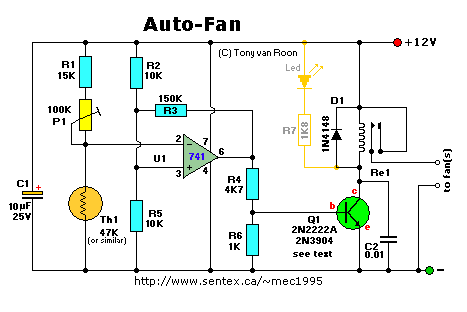
Here is a simple circuit for a temperature controller. It will control several cpu fans at an adjustable tempertature
setting. I recommend reading up on the full article here: [AutoFan]
This circuit I found to work best. Good circuit, working fine and a bit cheaper. All parts are available from Radio Shack
and Tandy. I found the 741-circuit easier to adjust and is used in the prototype. But, make your own choice.
The "Heat Sensor" circuit (available from the Circuits Page) works great too and uses a minimum of easily obtainable parts.
It uses a LM339 instead of a 741.
Back to Circuits Page, Continue to Part 3,
or go back to Part 1
Copyright © 1995, Tony van Roon (VA3AVR)
Last Updated: October 17, 2010