The ZAP-Adaptor, rejuvenates DEAD NiCads
By Tony van Roon
"Don't throw away those seemingly un-chargeable, rechargeable batteries; they could
very well be brought back to life with the aid of this simple circuit."
 It is a well known fact that rechargeable batteries have a tendency to "play possum", appearing to be dead, while merely
napping instead. It is also a known fact that such batteries can be awakened from their siesta by giving them
the proper "wake-up call". The Zap-Adapter described in this article is designed to arouse most of those batteries
from their seemingly endless slumber.
It is a well known fact that rechargeable batteries have a tendency to "play possum", appearing to be dead, while merely
napping instead. It is also a known fact that such batteries can be awakened from their siesta by giving them
the proper "wake-up call". The Zap-Adapter described in this article is designed to arouse most of those batteries
from their seemingly endless slumber.
Nickel-Cadmium batteries have a tendency to grow internal "whiskers"--fine weblike shorting paths between the internal
battery elements--when not used for prolonged periods of time. Those whiskers eventually discharge the cell completely.
when attempting to charge such a battery, the internal whiskers short out the relatively small charging current (which
is usually only about 1/10th of the cell's ampere rating), preventing the battery from being recharged.
Awakening a nickel-cadmium cell (assuming that it can be aroused) requires that a high-current be applied to the
battery for a couple seconds to blase away the whiskers. Once the whiskers are gone, you can charge the battery in the
normal manner.
The Zap-Adapter that we'll describe is intended for use with AA rechargeable nickel-cadmium batteries, which seem to be
the most popular size. The same design, with proper battery holders, can also be used for AAA, C, or D cells, all of
which are single cell types.
Parts List:
B1,B2 = AA nickel-cadmium battery
   S1 = Normally Open momentary pushbutton switch
   S2 = SPST slide or toggle switch
	 R1 = 50K potentiometer (optional, see text)
	 M1 = 50µA to 1mA meter (optional, see text)
	 I1 = 3-volt flashlight bulb (optional, see text)

Also: perfboard materials, enclosure, 3 AA battery holders, double-side tape,
      wire, solder, hardware, etc.
About the Circuit:
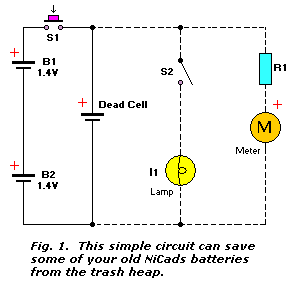
Figure 1 shows a schematic diagram of a simple circuit that can be used to dissolve the whisker formation that prevents
nickel-cadmium batteries from receiving a charge. The circuit consist of nothing more that two fully charged, series
connected nicad batteries (B1 and B2) and a switch (S1). Nickel cadmium batteries were used for the source because they
can deliver lots of current. For example, AA-size cells can deliver a continuous current of 0.5 amperes. Switch S1
allows you to control the amount of time that rejuvenating power is applied to the sleeping battery.
When S1 is closed, a jolt of current of sufficient magnitude is sent through the battery so as to cause the tiny whiskers
(shorts) within to open. Also, if the dead battery has become reverse-polarized, the polarity is also corrected by the
harsh treatment.
The dashed portion of the circuit in Fig. 1 is optional and can be included to allow you to monitor/test the circuit's
operation. Including the resistor (R1) and meter (M1) in the circuit eliminates the need for an external meter.
Adding a second switch (S2 in Fig. 1) and a flashlight lamp (I1) enables you to monitor the battery's voltage under
load. By removing the dead battery and closing S1 and S2 at the same time, you can test the live batteries under
load.
Construction:
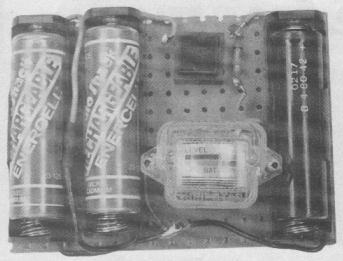
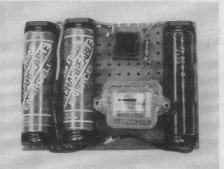
The Zap-Adapter was assembled on a small section of perfboard, just large enough to hold the circuit components. Three
inexpensive AA battery holders (like those available at Radio Shack/Tandy or other electronic distributors) were mounted
to the board; two battery holders, connected in series, for the source current current and the third for the battery
that is to be awakened. A push button switch was used for S1. The battery holders and switch can be mounted to the
board using double-side tape.
It is a good idea to put the single holder to one side of the board and the double holder (or two holder combination)
to the other side to separate the good cells from the bad. If you intend to include the meter and/or lamp circuit in
your project, be sure to leave room for them.
If you don't have a small DC milli-ammeter in your junkbox, look for one at swap meets, surplus outlets, or small order
catalogs. The meter should have a full-scale current rating of from 50 µA to 1 mA. If you intend to include a
meter in your circuit, it will be necessary to determine the appropriate value for R1. That can easily be done by
placing a 50K potentiometer in series with the meter, and connecting that branch circuit in parallel with the main
circuit, as shown in Fig. 1. Press S1, and adjust the potentiometer for a full-scale meter deflection. Once a
full-scale reading is obtained, measure the resistance of the potentiometer, and replace the potentiometer with an
equal-value fixed resistor.
If the lamp circuit is included in the project, be aware that different lamps draw different currents, and some may not
light with only 1.3 volts. The important thing though is not how bright the bulb glows (if at all), but how the meter
reacts.
Use:
Place two fully charged, nickel cadmium batteries in the source battery holders. The meter should give a 0-volt reading
since S1 (which is connected between the batteries and the meter) is open. When the switch is closed, the meter reading
should jump to between 2.5 and 3.0 volts, depending on the 'full' charge state. Next, put the dead cell in the holder
provided. If the meter reading is between 1.3 and 1.4 volts, the battery can be recharged in the normal manner. Since
there is no load on the dead battery, even a weak battery mush show a normal reading. What you're looking for is an
apparent dead battery.
 Assuming the meter shows the battery to be dead, press S1; the meter reading should rise rather quickly. Continue to
hold the switch closed for about three seconds; the meter should go to around 1.4 volts. If the meter reads nothing,
your battery has too far gone to revive. If the meter reading does not go all the way to 1.4 volts, try pressing S1
again to see if you can get it up to 1.4 volts. A couple deep-discharge/full-recharge cycles should rejuvenate the
battery.
Assuming the meter shows the battery to be dead, press S1; the meter reading should rise rather quickly. Continue to
hold the switch closed for about three seconds; the meter should go to around 1.4 volts. If the meter reads nothing,
your battery has too far gone to revive. If the meter reading does not go all the way to 1.4 volts, try pressing S1
again to see if you can get it up to 1.4 volts. A couple deep-discharge/full-recharge cycles should rejuvenate the
battery.
I fully support this project. Most parts can be obtained via your local Radio Shack or Tandy
store. I will answer all questions but via the message forum only. Tony's Message Forum can be accessed
via the main page, gadgets, or circuits page.
Copyright and Credits:
The original project was written by Fred Bleckman. Reproduced from Popular Electronics, September 1992, by
permission of Gernsback Publishing, Inc. (Gernsback Publishing is no longer in business). Document updates
& modifications, all diagrams, redrawn by Tony van Roon.
Re-posting or taking graphics in any way or form of this project is expressively prohibited by international
copyright © laws.
Back to Circuits or R/C Gadgets page
Copyright © 2002 - Tony van Roon