Home » Circuits
Home Network for ADSL
The increased availability of fast ADSL Internet connections has made it more attractive to install a small RJ45 Ethernet network in the home. Not only can you exchange files between computers, you will also have fast Internet access for everybody! This does of course require an ADSL modem with a router. It’s not possible to use a simple USB modem on its own. For laptops we recommend wireless Ethernet connections. If you find the laying of cables too difficult or inconvenient you can also add wireless capabilities to ‘ordinary’ PCs. You should bear in mind that the range of wireless connections could sometimes be disappointing. When a network is set up round a router you should use a star configuration for the cabling. This means that only a single PC is connected to each router socket. The connecting cable may have a maximum length of 90 m and usually terminates at a connection box. You should use a CAT5 cable with 8 conductors for this, which is suitable for speeds up to 100 Mb/s. The 8 conductors are arranged in 4 pairs, with each pair twisted along the length of the cable. It is extremely important that the wires of each pair are kept together and that they are kept twisted as much as possible. At the connector ends you should therefore make sure that the non-twisted sections of the cable are kept as short as possible, at most a few centimetres. Should you fail to do this you may find that the network won’t operate at the full rated speed or possibly cause interference. The wiring itself is very simple. Connect the plugs to the cables such that each pin connects to the corresponding pin at the other end.
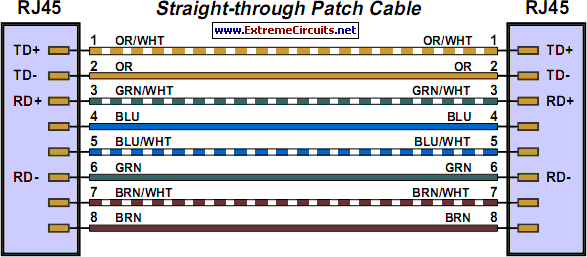
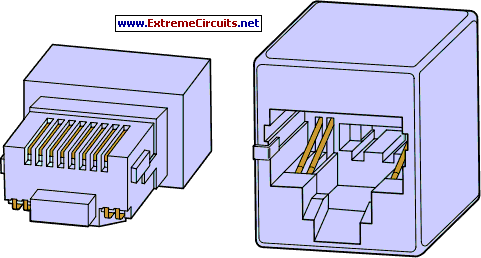 So pin 1 to 1, 2 tot 2 and so on. This also applies to all patch leads between the connection boxes and PCs (or if you prefer, the cable can go directly to the PC, without a connection box). It is only when two computers are connected directly together without a router that a crossover cable is required. The plugs are attached to the cable using a special crimping tool. It is also possible without the tool, using just a screwdriver, but this isn’t easy and we don’t recommend that you try it. The wires in the cable have different colours and there are no official standards in Europe how you use them (EN50173). However, the colour code in the American T568B standard is often used:
- orange/white
- orange
- green/white
- blue
- blue/white
- green
- brown/white
- brown
 If you use patch cables it helps to keep things organised by using coloured cables. Blue for Ethernet (red for a crossover cable), yellow for analogue telephones and green for ISDN. Sticky labels or coloured cable markers can also be used for identification when you can’t get hold of coloured cables. A new standard has recently been introduced, although you probably won’t use it in the home for a while. Since around two years ago you can also use a GG45 connector, which is compatible with RJ45. This has 4 extra contacts and is suitable for speeds up to 600 Mb/s (Category 7/Class F).
 Author: Karel Walraven
Copyright: Elektor Electronics