"Ladder" diagrams
Ladder diagrams are specialized schematics commonly used to document industrial control logic systems. They are called "ladder" diagrams because they resemble a ladder, with two vertical rails (supply power) and as many "rungs" (horizontal lines) as there are control circuits to represent. If we wanted to draw a simple ladder diagram showing a lamp that is controlled by a hand switch, it would look like this:

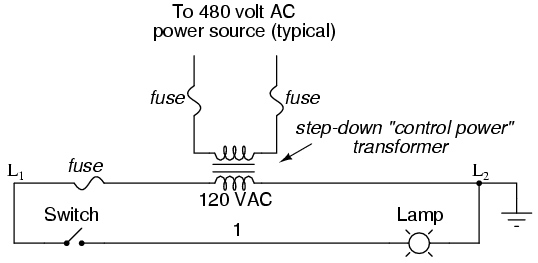
The "L1" and "L2" designations refer to the two poles of a 120 VAC supply, unless otherwise noted. L1 is the "hot" conductor, and L2 is the grounded ("neutral") conductor. These designations have nothing to do with inductors, just to make things confusing. The actual transformer or generator supplying power to this circuit is omitted for simplicity. In reality, the circuit looks something like this:
Typically in industrial relay logic circuits, but not always, the operating voltage for the switch contacts and relay coils will be 120 volts AC. Lower voltage AC and even DC systems are sometimes built and documented according to "ladder" diagrams:
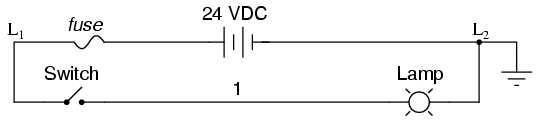
So long as the switch contacts and relay coils are all adequately rated, it really doesn't matter what level of voltage is chosen for the system to operate with.
Note the number "1" on the wire between the switch and the lamp. In the real world, that wire would be labeled with that number, using heat-shrink or adhesive tags, wherever it was convenient to identify. Wires leading to the switch would be labeled "L1" and "1," respectively. Wires leading to the lamp would be labeled "1" and "L2," respectively. These wire numbers make assembly and maintenance very easy. Each conductor has its own unique wire number for the control system that its used in. Wire numbers do not change at any junction or node, even if wire size, color, or length changes going into or out of a connection point. Of course, it is preferable to maintain consistent wire colors, but this is not always practical. What matters is that any one, electrically continuous point in a control circuit possesses the same wire number. Take this circuit section, for example, with wire #25 as a single, electrically continuous point threading to many different devices:

In ladder diagrams, the load device (lamp, relay coil, solenoid coil, etc.) is almost always drawn at the right-hand side of the rung. While it doesn't matter electrically where the relay coil is located within the rung, it does matter which end of the ladder's power supply is grounded, for reliable operation.
Take for instance this circuit:

Here, the lamp (load) is located on the right-hand side of the rung, and so is the ground connection for the power source. This is no accident or coincidence; rather, it is a purposeful element of good design practice. Suppose that wire #1 were to accidently come in contact with ground, the insulation of that wire having been rubbed off so that the bare conductor came in contact with grounded, metal conduit. Our circuit would now function like this:

With both sides of the lamp connected to ground, the lamp will be "shorted out" and unable to receive power to light up. If the switch were to close, there would be a short-circuit, immediately blowing the fuse.
However, consider what would happen to the circuit with the same fault (wire #1 coming in contact with ground), except this time we'll swap the positions of switch and fuse (L2 is still grounded):

This time the accidental grounding of wire #1 will force power to the lamp while the switch will have no effect. It is much safer to have a system that blows a fuse in the event of a ground fault than to have a system that uncontrollably energizes lamps, relays, or solenoids in the event of the same fault. For this reason, the load(s) must always be located nearest the grounded power conductor in the ladder diagram.
- REVIEW:
- Ladder diagrams (sometimes called "ladder logic") are a type of electrical notation and symbology frequently used to illustrate how electromechanical switches and relays are interconnected.
- The two vertical lines are called "rails" and attach to opposite poles of a power supply, usually 120 volts AC. L1 designates the "hot" AC wire and L2 the "neutral" (grounded) conductor.
- Horizontal lines in a ladder diagram are called "rungs," each one representing a unique parallel circuit branch between the poles of the power supply.
- Typically, wires in control systems are marked with numbers and/or letters for identification. The rule is, all permanently connected (electrically common) points must bear the same label.