Soldering
Question 1:
Both soldering irons and soldering guns are tools used in the process of electrical soldering. Describe what each of these tools looks like, and how they function.
Notes:
Antique soldering irons were really nothing more than iron wedges with wooden handles, which were set directly in a fire for heat, much like clothes irons used to be nothing more than an anvil-shaped mass of iron that was set on top of a hot stove for heat. I've used one of these old soldering irons to solder sheet metal pieces together, and the technique of use was exactly the same as it is for a modern (electric) soldering iron.
If you have soldering irons and guns available in your classroom, show them to your students during discussion.
Question 2:
What does it mean to tin a piece of wire prior to making a soldered connection with it?
Notes:
Some wire may be purchase "pre-tinned" to save you this step, but most electrical wire is not. Here is a helpful hint: tinning the ends of a piece of stranded copper wire really helps to prevent individual strands from bending and breaking away when the wire end is clamped in a terminal strip!
Question 3:
All electrical soldering, and most other forms of soldering as well, requires the addition of a substance known as flux. What is the purpose of adding "flux" to the soldering process, and what type of flux is typically used for electrical soldering?
Notes:
This question, and the corresponding answer, point to one of the fundamental requirements for a good solder joint: clean metal surfaces. Flux is designed to chemically clean the joint prior to and during the soldering process, but it is no substitute for proper preparatory cleaning beforehand.
Discuss this point with your students. If possible, set up some wire connections to be soldered, and show the effects of a small amount of oil or grease on a solder joint (even when using flux).
Question 4:
As in all technician tasks, safety must be your first priority. Soldering harbors specific dangers of its own that you need to be aware of. Explain what precautions you need to take with regard to the following aspects of soldering:
- �
- Safe handling of soldering iron/gun
- �
- Safe handling of solder and flux
- �
- Personal protective equipment
- �
- What to do (and not do) after soldering
- �
- Never hold it by the metal end - always by the handle!
- �
- Place iron on a stand when idle, and be careful that no flammable materials contact it.
- �
- Never leave the iron on, unattended.
- �
- Never hold solder in your mouth, as it contains heavy metals that are not healthy for your body.
- �
- Avoid breathing fumes - use a ventilation hood if available.
- �
- Do not eat food while soldering.
- �
- Wash your hands after soldering.
- �
- Safety glasses or goggles - an absolute must!
- �
- If soldering large wires, use heat-resistant gloves.
- �
- Clean up worksite.
- �
- Give the soldering iron enough time to cool down before putting it away.
- �
- Put soldering equipment away where it belongs, and where others can find it.
- �
- Never leave the iron on, unattended.
Notes:
Much of this is common sense, but some of it is not. Students must realize that even though soldering is a relatively low-temperature process, it is still hot enough to start fires and burn skin. Also, molten droplets of solder can cause major damage to the eyes, so safety glasses/goggles are imperative.
Question 5:
Semiconductor components such as diodes and transistors are easily damaged by the high temperatures of soldering, so care must be taken to protect these components during the soldering process. One way to do this is to use a heat sink to draw heat away from the component without cooling the connection point too much. Heat sinks made out of sheet metal may be temporarily clipped to the component leads, one at a time, to prevent the solder's high temperature from thermally conducting all the way to the component body:

|
|
In the absence of a formal heat sink, can you think of any ways to fashion your own ïmpromptu" heat sinks out of commonly available tools and/or objects?
Notes:
This is an exercise in creative thinking, as well as an introduction to one of the practical concerns of soldering. Even some passive components (electrolytic capacitors, for example) do not handle high temperatures well, and so learning to manage temperatures is an important skill when performing maintenance or prototype soldering. See if you and your students can invent any other simple "heat sinks" for use when a formal heat sink is not available.
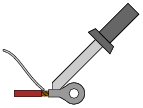
Question 6:
When soldering a wire into a metal lug, which of these positions would be considered best for soldering iron and solder?
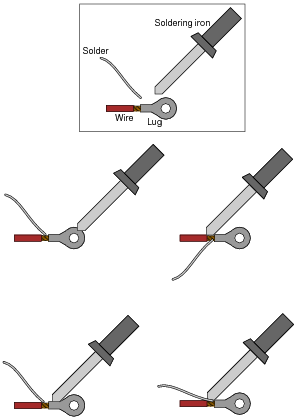
|
|
Explain why you think one of these positions is better than the others for producing a sound solder connection between the lug and the wire.
|
|
Notes:
Discuss with your students why the positions shown in the answer would be superior to the others shown in the question. Keep in mind principles of heat conduction and the necessity for all parts of the connection to be at sufficient temperature as to melt the solder. What, precisely, would be wrong with trying to solder this connection in any of the other ways shown?
Question 7:
What is a cold solder joint? Identify its causes, its appearance, and the means of correction.
Notes:
Ask your students where they obtained their information regarding the causes, appearance, and remedy for cold solder joints. There is a lot of information available on soldering, and it is always interesting and informative to discover new sources of information for future reference.
Question 8:
After a period of use, the tip of a soldering iron (or a soldering gun) becomes dark and ëncrusted" with oxidation and flux residue. Describe why this accumulation impedes the soldering process, and how it may be removed.
Notes:
Discuss with your students why a wet sponge or rag works to clean the end of a heated soldering tool. Also, discuss what to do to the tip of a soldering tool that has been abused by lack of periodic cleaning.
Question 9:
What may be done if you solder a component into a circuit board and then realize you soldered it in the wrong place? What, exactly, must you do to move this component to a different location on the board?
- �
- De-soldering "wick"
- �
- De-soldering bulb
- �
- De-soldering "pump"
- �
- Vacuum station
Notes:
Ask your students to describe how some common desoldering tools (wick, bulb, plunger, vacuum system) work, and also ask them where they obtained their information.
Question 10:
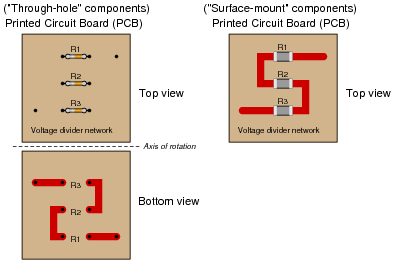
Explain what surface-mount devices are, and how the soldering and desoldering processes for them differ from the processes used to solder and de-solder "through-hole" components on printed circuit boards. The following illustration contrasts "through-hole" component construction versus surface-mount construction for a voltage divider circuit (three resistors connected in series):
|
|
Notes:
Ask your students to describe some of the special soldering equipment that must be used for surface-mount devices? How does it differ in terms of power from regular soldering irons and guns? Why are surface-mount soldering tools rated at a different power level?
Ask your students to describe how surface-mount components may be held to the board during the soldering process. Are all surface-mount components identical, or are there different types? What special soldering tool attachments are available for working with surface-mount devices?
Question 11:
The equation for converting degrees Celsius (oC) to degrees Fahrenheit (oF) is as follows:
|
Use this equation to convert the following temperatures from Celsius to Fahrenheit:
- �
- 0oC =
- �
- 100oC =
- �
- -40oC =
- �
- 250oC =
- �
- 310oC =
Now, algebraically manipulate the equation so that you may solve for degrees Celsius from a given figure in degrees Fahrenheit. Show all your work, then check your results by working backward through the five calculations above to arrive at the original figures in degrees Celsius.
- �
- 0oC = 32oF
- �
- 100oC = 212oF
- �
- -40oC = -40oF
- �
- 250oC = 482oF
- �
- 310oC = 590oF
|
Notes:
The last instruction given in the question - working backwards through the five calculations to see if you get the original (given) figures in degrees Celsius - is actually a very useful way for students to check their algebraic work. Be sure to make note of this in class!
Question 12:
What is soldering? What is solder?
"Solder" is a special alloy of metals designed to melt at a low temperature, to make permanent electrical connections.
Notes:
It should be noted that not all forms of soldering are "low temperature." Silver soldering, for example, takes place at much greater temperatures than regular electrical soldering. However, all soldering is a form of welding.
Question 13:
Find a printed circuit board with soldered components on it, and bring it with you to class for discussion. If you have access to a scrap bin from an electronics or computer repair shop, this would be an excellent place to find a printed circuit board. On your PCB, try to identify:
- �
- Number of layers on board
- �
- "Traces"
- �
- "Lands"
- �
- Cold solder joints (if any)
- �
- Solder bridges (if any)
Follow-up question: be sure you know what each of these terms ("trace", "cold solder joint", ßolder bridge", etc.) means.
Notes:
The purpose of this question is to get students to kinesthetically interact with the subject matter. It may seem silly to have students engage in a ßhow and tell" exercise, but I have found that activities such as this greatly help some students. For those learners who are kinesthetic in nature, it is a great help to actually touch real components while they're learning about their function.