Active Antenna AA-7 HF/VHF/UHF, 3-3000MHz
By Fred Blechman
"Lift those hard-to-hear signals out of the mud with this handy receiver accessory."
If you have a shortwave or high-frequency receiver or scanner that is struggling to capture signals with a short, whip
antenna, and you'd like the kind of performance that a 60-foot 'longwire' antenna can provide but lack the space to put
one up, consider building the AA-7 HF/VHF/UHF Active Antenna described in this article. The AA-7 is a
relatively simple antenna that is designed to amplify signals from 3 to 3000 MegaHertz, including three recognized
ranges: 3-30Mhz high-frequency (HF) signals; 3-300Mhz very-high frequency (VHF) signals; 300-3000MHz ultra-high (UHF)
frequency signals. Those bands are typically occupied by shortwave, ham, government, and commercial radio signals.
Active Antennas:
In its simplest form, an active antenna uses a small whip antenna that feeds incoming RF to a pre-amplifier, whose
output is then connected to the antenna input of a receiver. Unless specifically designed otherwise, all active
antennas are intended for receive-only operation, and thus should not be used with transceivers; transmitting into
an active antenna will probably destroy its active components. A well designed broadband active antenna consider
field strength of the desired signal (measured in microvolts per meter of antenna length), atmospheric and other
noise, diameter of the antenna, radiation resistance, and antenna reactance at various frequencies, plus the
efficiency and noise figure of the amplifier circuit itself.
Circuit Description:
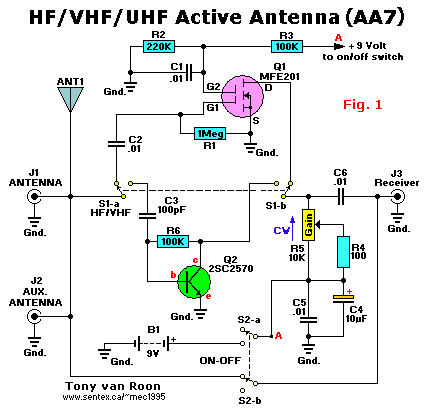
Fig. 1 shows the schematic diagram of the AA-7, which contains only two active
elements; Q1 (an MFE201 N-Channel dual-gate MOSFET) and Q2 (a 2SC2570 NPN VHF silicon transistor). Those transistors
provide the basis of two independent, switchable RF pre-amplifiers. Two double-pole double-throw (DPDT) switches play
a major role in this operation of the AA-7. Switch S1 is used to select one of the two pre-amplifier circuits (either
HF or VHF/UHF). Switch 2 is used to turn off the power to the circuit, while coupling the incoming RF directly to
the input of the receiver. That gives the receiver non-amplified access to the auxiliary antenna jack, at J1, as well
as the on-board telescoping whip antenna. With switch S2 in its power-on position, the input and output jacks are
disconnected and B1 (a 9 volt battery) is connected to the circuit. With switch S1 in the position shown in the
schematic, incoming RF is directed to the HF pre-amp circuit built around Q1 (an MFE201 N-Channel dual-gate MOSFET).
The HF pre-amp operates with an exceptionally low noise level, and is ideal for copying weak CW and singe-side band
signals. When S1 is switched to the other position, the captured signal is coupled to the VHF/UHF pre-amp built around
Q2 (a 2SC2570 NPN VHF silicon transistor), which has excellent VHF through microwave characteristics. With the
on-board whip antenna adjustable to resonance through much of the VHF-UHF region (length in feet = 234 divide by the
frequency in MHz), the VHF/UHF mode is ideal for indoor and portable use with VHF scanners and other receivers. Either
mode can be used when tuning 3-30 MHz HF signals. The VHF/UHF pre-amp offers higher gain than the HF pre-amp, but also
has a higher noise level. You can easily choose either amplifier for copying any signal; of interest--just try both
positions. The RF gain control (R5) can be used to trim the output of either amplifier.
Caution: The AA-7 is not intended for
transmitting operation (be it Ham, Maritime, or CB); if it is used with a transceiver of any kind, make sure it is not
possible to transmit by accidentally pressing a mike button or CW keyer. Transmitting RF into the AA-7 is likely to
ruin one or both of the transistors in the circuit.
Construction:
The AA-7, which can be built from scratch or purchased in kit form from the supplier listed in the Parts List, was
assembled on a printed circuit board, measuring 4 by 4-11/16 inches. A template for the pcb board is shown in fig. 2.
You can either etch your own board from that template, or purchase the circuit board or the complete kit of parts
(which includes the pcb and all parts, but not the enclosure). The kit comes with a 16-page kit instruction manual
that gives step-by-step assembly instructions and contains additional information not covered in this article. Kit
assembly time, working slowly and carefully, should take less than an hour. Most of the parts specified in the Parts
list are standard components and can be procured through conventional hobby electronics suppliers. However, some
parts--J1, J2, S1, S2, and R5-- have particular physical mounting dimensions; the Printed Circuit Board is designed to
accept these particular parts. In addition, Q1 and Q2 can be hard to find; however, it is possible to make substitutions
provided that you can find a supplier. Suitable replacements for Q1 and Q2 are given in the Parts List.
The telescoping whip antenna screw-mounts to the board; the screw provides contact between the printed circuit board
traces and the antenna. To save time and trouble locating and ordering hard-to-find parts, a Special Parts Kit is also
offered by the supplier listed in the Parts List.
A parts placement (layout) diagram for the AA-7's printed circuit board is shown in figure 3. When assembling the
circuit, be especially careful that transistors Q1 and Q2, and the electrolytic capacitor C4, are oriented as shown.
Although not shown in the schematic (Fig. 1) or the layout (Fig. 3) diagrams, an optional led power indicator can be
added to the circuit. Adding a power indicator to the circuit allows you to tell at a glance if the circuit is on;
leaving the circuit on, even though the AA-7 draws only about 0.7 mA, will eventually discharge the battery. Of
course, adding an led will increase the current drain to by about 7 mA, but the red glow makes it obvious when the
unit is on.
If you decide to include the LED indicator in your project, power for the indicator can be easily taken from the switched
9-volt DC terminal of S2 (center terminal, right side, looking at the top of S2). Simply connect the positive voltage
to the anode (longer wire) of the led and connect her cathode lead through a current limiting resistor of about 1000
ohm to a ground point on the printed circuit board, or as the author did from the frame of R5. Mount the led at
any convenient point near the switch.
Although not supplied with the kit, a custom plastic enclosure (with front and back panels) or a regular 'hobby'
case of some sorts, and knobs for the switches and gain control can be purchased from most local electronics stores or
mail-order.
 Test and Use:
Prepare a coaxial cable to connect the RF output of the AA-7 to the antenna input of your receiver or scanner. One
end of the interconnecting cable must be terminated with an RCA phono plug; the other end connector depends on the
target receiver or scanner. With some receivers, the only practical connection is to clip the output of the AA-7 to
the receiver's antenna, although that connection won't be as effective as conventional (ground-return type) coupling.
To increase signal strength, especially for the lower frequencies, you can connect a simple supplementary portable
antenna of any design (a dipole, random-length wire with Earth ground, a bigger vertical whip of some kind, etc.) to
the circuit. Just use a small-diameter coaxial cable terminated in an RCA plug for mating with J1.
No alignments are required. If you're using the whip antenna, simply connect the output of the AA-7 to your receiver,
with the unit turned off (that's the bypass position) and the RF gain control (R5) turned fully counter-clock wise.
Turn on the receiver and tune-in a weak station. Switch S2 on, and adjust the gain control clockwise to increase the
output signal. Toggle S1 back and forth to see which setting gives you the best results. Don't be surprised if the
gain control overloads the receiver; if so, back it off.
Troubleshooting:
The fact that there are two independent pre-amplifiers in the AA-7 makes faults easier to diagnose than with many other
devices. If a problem occurs, only at one setting of S1, concentrate on that part of the circuit. If the problem is
common to both settings, the components and the connections common to both preamps should be checked. Make sure the
jumper wires are in place!
There are other characteristics or phenomena associated with preamplifiers and active antennas that does not mean that
your circuit is malfunctioning. For example, if you have strong AC hum in the HF setting, the antenna is too close to
an AC cord or powerline. HF signals may be clearer at the VHF/UHF setting than in the HF setting. Why? Although
either pram may be used for HF, the signal strength will be greater with the VHF/UHF pram. However, the HF
signal-to-noise ration is better with the dual-gate-MOSFET-based pram. Try both and use the best for your particular
receiver conditions.
Some portable receivers not enclosed in metal cases may break into oscillation when connected to any RF preamplifier.
Try reducing the AA-7's gain and make sure that good grounds are provided with the interconnecting coax cables. A
preamplifier will intensify any problems due to poor receiver design: overloading, images, or any other problems with
selectivity and image rejection.
 Parts List and other components:
Semiconductors:

Q1 = MFE201, SK3991, 3N201 (R2 not needed), or NTE454 N-Channel, dual-gate MOSFET, TO-72 (see text)
Q2 = 2SC2570, NTE107. Silicon RF IF/Amp, NPN transistor (see text)
     Note: If you use the NTE107 as a replacement, make sure to insert it correctly
     into the pcb.  The orientation is different than as shown on the parts layout
     diagram. (e-c-b seen front view for NTE107).  See this Data Sheet


Resistors:
All Resistors are 5%, 1/4-watt
   R1 = 1 Mega Ohm
   R2 = 220K
R3,R6 = 100K
   R4 = 100 ohm
   R5 = 10K potentiometer (pc mount)

Capacitors:
C1,C2,C5,C6 = 0.01uF, ceramic disc
         C3 = 100pF ceramic disc
         C4 = 4.7 to 10uF, 16WVDC, radial lead electrolytic

Additional Parts & Materials:
   B1 = 9-volt alkaline battery
S1,S2 = DPDT PC mount pushbutton switch
J1,J2 = PC mount RCA jack
 ANT1 = Telescoping whip antenna (screw mount)
 MISC = PCB materials, enclosure, enclosure, battery holder and connector,
        wire, solder, etc.

If you wish to purchase the AA-7 as construction KIT, click here>>  [AA-7 KIT]
Fig. 1.
"The AA-7 Active Antenna contains only two active elements: Q1 and Q2 (a 2SC2570 NPN VHF silicon transistor),
which provide the basis of two independent, switchable RF preamplifiers."
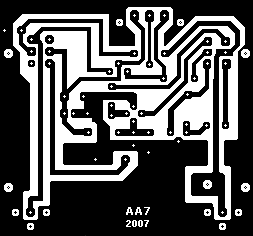
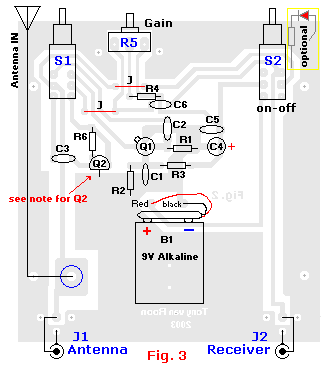
Fig. 2. "The AA-7 was assembled on a printed-circuit-board (PCB), measuring about 4
by 4-11/16 inches. A template for the printed-circuit-board is shown here. Note that it may not be to scale.
Parts assembly diagram (layout) is shown in Fig. 3
to make soldering the unit together a breeze!"
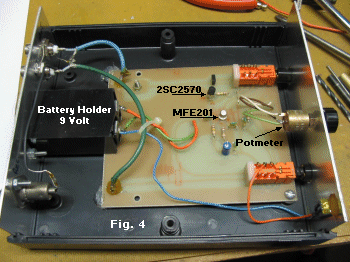
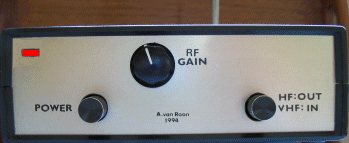
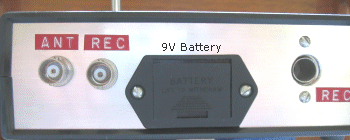
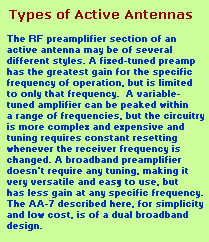 Fig. 4. shows the finished assembly without the enclosure. Make sure the antenna-hole in the enclosure
is in-line with one on the pcb. On mine I used a stud with thread on both sides to enable me to use different length
antenna's; all I have to do is unscrew and screw another antenna back in without taking the AA-7 apart. I used a 9-volt
battery tray which allows me to replace the battery without opening up the case, but the regular battery clip and battery
works fine. As you can see from the pictures, this is a nice one-evening project.
Fig. 4. shows the finished assembly without the enclosure. Make sure the antenna-hole in the enclosure
is in-line with one on the pcb. On mine I used a stud with thread on both sides to enable me to use different length
antenna's; all I have to do is unscrew and screw another antenna back in without taking the AA-7 apart. I used a 9-volt
battery tray which allows me to replace the battery without opening up the case, but the regular battery clip and battery
works fine. As you can see from the pictures, this is a nice one-evening project.
Power consumption is minimum. Most parts can be obtained via your local electronics
store. I will answer all questions but via "Tony's Message Forum" only. This Forum can be accessed via the main
page, gadgets, or circuits page.
Copyright and Credits:
Source: "Electronics Hobbyist Handbook", Spring 1994. Copyright © Fred Blechman
and Gernsback Publications, Inc. 1994. Published with permission from Gernsback. (Gernsback Publishing no longer
exists).
Document updates & modifications, all diagrams, PCB/Layout drawn by Tony van Roon.
Re-posting or taking graphics in any way or form of this project is expressly prohibited by international
copyright laws.
Back to Circuits page
Page Copyright © 1995 - Tony van Roon
Project Copyright © 1994, by Fred Blechman