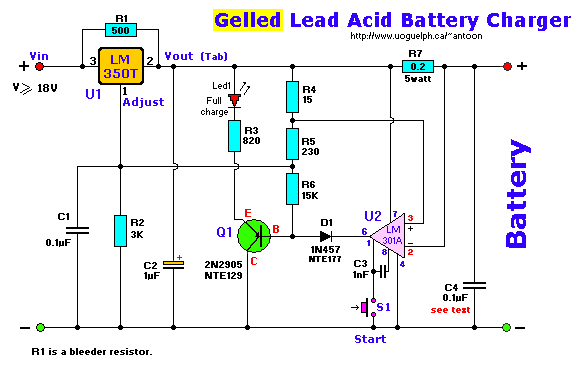
Parts List:
All resistors are carbon, 1/4 watt, 5% tolerance, unless otherwise indicated.
R1 = 500 ohm              C1 = 0.1uF (100nF), ceramic       U1 = LM350T
R2 = 3K                   C2 = 1uF/40 volt                  U2 = LM301A
R3 = 820 ohm              C3 = 1000pF (1nF), ceramic        S1 = Pushbutton switch (normally-open)
R4 = 15 ohm               C4 = 0.1uF, ceramic (see text)
R5 = 230 ohm              D1 = 1N457 (or equiv.)
R6 = 15K                Led1 = Red, 5mm, ultra-bright
R7 = 0.2 ohm, 5W, WW      Q1 = 2N2905, PNP, TO-39 case
This high-performance circuit first quickly starts (and holds) the charge at 2 amp, but as the voltage
rises the current will consequently decrease.
When the current falls below 150mA, the charger automatically switches to a lower 'Float' voltage to prevent
overcharging.
At the point that a full charge is reached, Q1 will bias and the LED will light.
The LM301A is a 8-pin OpAmp. Transistor Q1 is a PNP, Silicon, AF-Out type with
a TO-39 metal case and can be substituted for a NTE or ECG129. Diode D1, a Si, GP Det. type, can be substituted
with a NTE177 or ECG177. The LM350 (U1) needs to be cooled.
The input voltage should equal or about 18volts.
R1's function is to bleed some of the input voltage to the output and vice-versa. A 1N4002 or similar diode can be
used also.
R2 and R5 are actually metal-film type resistors. To get the 3K for R2 use two 1K5 (1500 ohm)
resistors in series. For R5 use two 470 ohm resistors in parallel. Or whatever combination to get to these values.
For R1, 500 ohm, you can use two 1K in parallel or 470 + 33 ohms in series.
R7, the 0.2 ohm resistor, is a 5 watt wire-wound type. Do not use the standard carbon type.
C4: This (optional) 0.1uF (100nF) Ceramic capacitor needs to be mounted over the power lines and as close to the LM301 (U2)
as possible. It will filter off any possible residue hf ripple, which otherwise may prevent this op-amp from working
properly. Use only if you have problems with the LM301 not switching off.
S1 is a subminiature pushbutton switch, normally open. I received a couple emails in regards to this switch.
I thought the diagram was pretty clear. It shows an 'open' switch with the arrow indicating a 'momentary'
connection when pushed. Nothing out of the ordinary here folks and a standard symbol for electronics...
When the start switch is pushed, the output of the charger goes to 14.5 V. As the batttery approaches full
charge, the charging current decreases and the output voltage is reduced form 14.5V to about 12.5V, terminating
the charging process. Transistor Q1 then lights the led as a visual indication of a full charge.
Note: This circuit will both work for Gel cell and regular L.A. batteries, and is from an application note found
in the National Linear 1 Databook as part of their regulator spec datasheets (#400041, Rev.1, Page 1-147).
Back to Circuits Page

