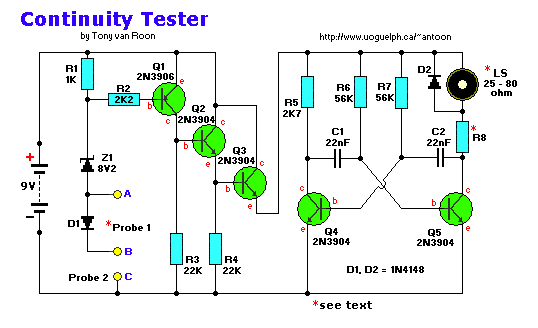
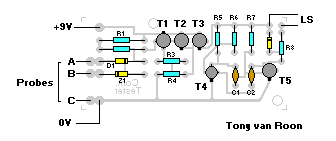
Parts List:
   R1 = 1K                  D1,D2 = 1N4148
   R2 = 2K2                    Z1 = 8V2, 1/4 watt
R3,R4 = 22K                    Q1 = 2N3906 (PNP)
   R5 = 2K7              Q2,3,4,5 = 2N3904 (NPN)
R6,R7 = 56K              9volt Alkaline battery
   R8 = *See text        suitable loudspeaker
C1,C2 = 22nF             enclosure & probes
An on-off switch is not necessary. D1 is used when the battery is brand-new and giving over the nominal 9 volt,
Q1, Q2 and Q3 acting as the switch for supplying power to the multivibrator.
Design Considerations:
Several simple circuits were tried -- a lamp, battery and probes still demanded the attention of the eyes; replacing
the lamp with a buzzer was more successful but needed some three to four volts and gave no indication of a series
semiconductor junction if the polarity was correct while the current flow was large enough to damage the more delicate
devices within the circuit under test. An extension of the principle to operate an astable (multivibrator) type of
oscillator gave good audibility but would operate from zero through to several thousands of ohms and so was too general
an indication.
A set of specifications was becoming apparent; (1) probe current to be small; (2) probe voltage to be as low as
possible, preferable less than 0.3V to avoid seeing germanium or silicon junctions as a continuous circuit; (3) no
on/off switch to be used.
The above circuit was the result and several have been designed and are earning their keep for both "heavy"
electricians and electronic technicians.
How it works:
Starting with a 9 volt supply, when the probes are shortcircuited there is a 8.2 volt drop across the zener diode Z1
leaving a maximum of 0.8 volt across R1. Application of Ohms' Law shows that a maximum current of 0.8/1,000 = 0.8 mA
lows via the probes and this satisfies the first design requirement of low probe current.
Q1 is a silicon type and the base-emitter voltage will need to be about 0.5 to 0.6 volt to forward-bias the junction
and initiate collector current. With a maximum of 0.8 volt available across R1 it is seen that if a semiconductor
junction or resistor is included in the outside circuit under test and drops only 0.3 volt then there will be 0.5 volt
remaining across R1, barely enough to bias Q1 into conduction.
Assuming that the probes are joined by nearly zero resistance, the pd across R1 is 0.7 - 0.8 volt and Q1 turns on, its
collector voltage rising positively to give nearly 9 volt across R3. Q2 is an emitter follower and its emitter thus
rises to about 8.3 volt and this base voltage on Q3 (a series regulator circuit or another emitter-follower if you
prefer it) results in some 7.7 volt being placed across the Q4 - Q5 oscillator circuit.
All the transistors are silicon types and unless the probes are joined, the only leakage current flows from the
battery thus avoiding the need for an On-Off switch. When not in use, the battery in the tester should have a life
in excess of 2 years. My own unit lasted for more than 2 years with one standard Alkaline battery.
Descriptive Notes:
The output from the speaker is not loud but is more than adequate for the purpose. I used a small transistor radio
loudspeaker with an impedance of 25 - 80 Ohms. The resistance should be brought up to 300 ohms
by adding series resistor R8.
Example, if your speaker is 58 ohms, then R8 = 242 ohms. If your loud speaker is 8 ohms, then R8 = 292 ohms, etc.
An experiment worth doing is to select the value of either C1 or C2 to produce a frequency oscillation that coincides
with the mechanical resonant frequency of the particular loudspeaker in use. Having chosen the right value, which
probably lies in the range of 10n - 100n, the tone will be louder and more ear piercing. A "freewheel" diode D2 is
connected across the transducer since fast switching action of the oscillator circuit can produce a surprisingly high
back e.m.f. across the coil and these high voltages might otherwise lead to transistor damage or breakdown.
Zener diodes do not provide an absolutely constant volt-drop regardless of current; at the 0.8 mA design current an
8.2 volt diode will quite possibly give only about 8.0 volt drop since test current for zener selection and marking
is typically 5 mA or more. A further possible source of error is the battery; the one suggested, nominally provides
9V but a brand new one may be as much as 9.2 - 9.6V until slightly run-down and this "surplus" voltage, combined with
an "under-voltage" zener volt-drop will leave considerably more than the forecast voltage available at the probes.
A silicon diode D1 is therefore connected in series with the zener to decrease the probe voltage by a further 0.6
volt or so.
During your final testing and before boxing your circuit, the most suitable connection, A or B, is selected for the
positive probe wire. The aim is to have the circuit oscillating with short circuited probes but to stop oscillation
with the least amount of resistance or the inclusion of a diode (try both ways) between the probes.
This is a simple tester so a bit of experimentation for the correct resistor value may or may not be required.
No sensitivity control is fitted because I don't think it is worthwhile nor necessary and would spoil the simplicity
of the circuit.
There is no easy way to proof the unit against connection to the supply. Be careful if checking AC line
wiring and switch off first. In a similar way, if checking electronic apparatus for unwanted bridging between tracks,
for instance or a suspected crack in a PCB (Printed Circuit Board) track switch off power first also.
DISCHARGE ALL LARGE CAPACITORS. Good luck!
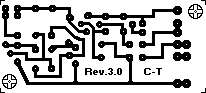
The pcb pattern above is shown full-size at 73mm x 33mm (2-7/8" x 1-1/4")
Back to Circuits page
© 2002 Tony van Roon