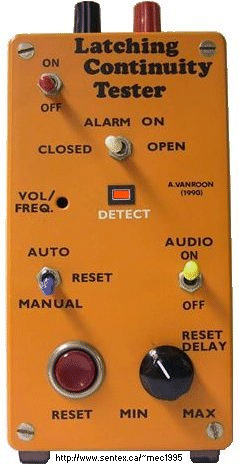
Latching Continuity Tester
by Tony van Roon
"This Latching Continuity Tester can help you locate those difficult-to-find
intermittent short and opens that other testers always seem to miss. It has been part of my workbench for many
years and performs superb. I have solved many intermittent problem with this highly flexible unit."
 A continuity tester is a must on every
service bench for testing cables, pc-boards, switches, motors, plugs, jacks, relays, and many other kinds of components.
But there are times when a simple continuity test (or your multi-meter) doesn't tell the whole story. For example,
vibration-induced problems in automobile wiring can be extremely difficult to detect because a short or open is not
maintained long enough for a non-latching tester to respond. And an analog meter is too slow to react.
A continuity tester is a must on every
service bench for testing cables, pc-boards, switches, motors, plugs, jacks, relays, and many other kinds of components.
But there are times when a simple continuity test (or your multi-meter) doesn't tell the whole story. For example,
vibration-induced problems in automobile wiring can be extremely difficult to detect because a short or open is not
maintained long enough for a non-latching tester to respond. And an analog meter is too slow to react.
This latching continuity tester detects intermittent (and steady state) opens and shorts. The tester will detect
and latch on an intermittent condition with a duration of less than a millisecond. In addition, it provides both
visual and (defeatable) audio indicators, uses only one inexpensive and easy-to-find IC, and can be built very cheap
if you have a well-stocked junk box. For those who like 'kit' building, it is available.
Circuit Elements:
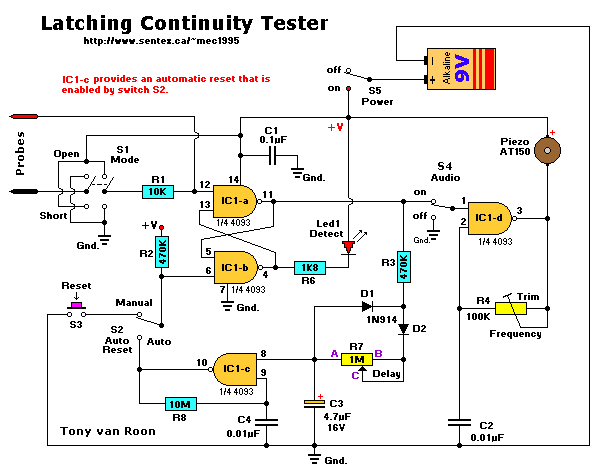
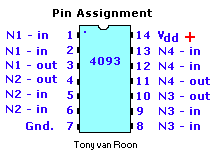
 The heart of the circuit is a 4093 quad two-input NAND Schmitt trigger, one gate of which is shown in Fig. 1-a. The
gate functions as shown in Fig. 1-b. Nothing happens until the enable input goes high. When that happens, the
output responds to the input as follows.
The heart of the circuit is a 4093 quad two-input NAND Schmitt trigger, one gate of which is shown in Fig. 1-a. The
gate functions as shown in Fig. 1-b. Nothing happens until the enable input goes high. When that happens, the
output responds to the input as follows.
As long as the input voltage stays between VH and VL, the output stays high. But when the input
goes above VH, the output goes low. The output will not go high again until the input goes below
VL. That characteristic is what gives the Schmitt trigger its ability to "square-up" a slowly changing
input signal. The Schmitt trigger is ideally suited for our application because it is not dependent on edge
triggering, and because both slow and fast signals trigger it when either threshold is exceeded.
We use two gates of the 4093 as a combination detector and latch. The gates are cross connected to form an SR
(Set-Reset) flip-flop. When pin 12 goes low, pin 11 will go high. That high may be used to enable
an LED or other indicator. Switch S1 is used to select whether the tester will provide output when it detects an
open or a short. In the OPEN position, pin 12 is held low, so the output of the gate is normally high.
When the test leads are connected across a short, pin 12 is pulled high, so the output drops low. The circuit works
in the converse manner when S1 is in the CLOSED position.
As shown in Fig. 2-a, we use another Schmitt trigger to build a gated astable oscillator. A gated astable oscillator
produces output as long as the GATE input is high.
Fig. 2-b shows the waveforms that are present at various points in the circuit. When the pin-8 input goes high,
pin 10 goes low, and C1 starts discharging through R1.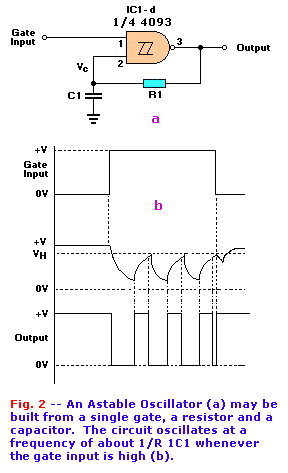 When VC falls below VL, the output of the gate goes high, so C1 starts charging through R1.
When VC exceeds VH, the output again drops low. Oscillation continues in that way as long as
the gate input remains high. The frequency of oscillation is given by a fairly complex equation that
can be simplified, for purposes of approximation, as F = 1 / R1C1.
When VC falls below VL, the output of the gate goes high, so C1 starts charging through R1.
When VC exceeds VH, the output again drops low. Oscillation continues in that way as long as
the gate input remains high. The frequency of oscillation is given by a fairly complex equation that
can be simplified, for purposes of approximation, as F = 1 / R1C1.
Putting it all together:
The complete circuit is shown in Fig. 3. In that circuit, IC1-a and IC1-b function as the flip-flop/detector.
The output of IC1-a is routed through S4, AUDIO. When that switch
is closed, IC1-d is enabled and an audio tone will be output by BZ1. The frequency of that tone can vary from 1000Hz
to well above the audio range (100KHz), according to the setting of R4. In addition, R4 varies frequency and volume
simultaneously, so you can set it for the combination that pleases you best.
Originally we used a PM (Permanent Magnet) speaker. When the detector has not been tripped, the full power-supply
voltage is across the buzzer, but no current is drawn. The reason is that the piezo element is like a capacitor and
does not conduct DC current. When the circuit is oscillating, the buzzer consumes a current of only about 0.5
milli-amp.
The output of the flip-flop/detector circuit also drives IC1-c. If S2 is in the AUTO position, the
output of IC1-c will automatically reset the flip-flop after a period of two to six seconds, depending on the
position of R7. If S2 is in the MANUAL position, the LED will remain lit (and the buzzer will
continue buzzing, if S4 is on) until manual RESET switch S3 is pressed
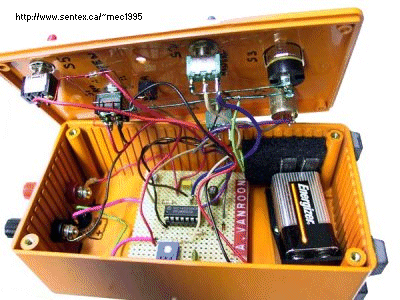
 Construction:
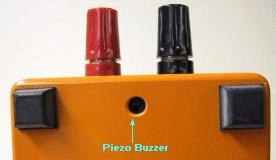
Picture at the left shows the tester from the back. The hole is for the piezo buzzer. The circuit may be built on a
piece of perfboard or Vero-board, or on a PCB. The PCB is designed to take board-mounted switches, which makes a neat
package and eliminates a rat's nest. (see prototype picture below).
Referring to Fig. 4, mount and solder the components in this order: diodes, fixed resistors, IC-sockets, capacitors,
variable resistors, and then the pcb mounted switches. The regular ones will work too it just means more wire.
Mount the buzzer and the LED last as described below. Trimmer potentiometer R7 is manufactured by Piher
(903 Feehanville Drive, Mount Prospect, IL 60056); it has a shaft that extends through the panel. If the Piher pot is
unavailable, an alternate is available from Digi-Key (701 Brooks Ave, South, P.O. Box 677, Thief River Falls, MN 56701).
The disadvantage of the alternate is that it has no shaft, so it must be adjusted using a miniature screwdriver.
 The circuit board can be mounted in several ways. Stand-offs, rubber feet, or simply two layers of double-sided foam
tape works great! The LED and the buzzer should be inserted in the appropriate holes in the pcb now. Then install the
top cover, and adjust the height of the LED so that it protrudes through the top cover. Then solder its leads. Mount
the buzzer over the little hole either the front panel or the back using silicone rubber adhesive (RTV or double sided
foam-tape-with-a-hole-in-the-middle).
The circuit board can be mounted in several ways. Stand-offs, rubber feet, or simply two layers of double-sided foam
tape works great! The LED and the buzzer should be inserted in the appropriate holes in the pcb now. Then install the
top cover, and adjust the height of the LED so that it protrudes through the top cover. Then solder its leads. Mount
the buzzer over the little hole either the front panel or the back using silicone rubber adhesive (RTV or double sided
foam-tape-with-a-hole-in-the-middle).
We mounted a pair of banana jacks on the top of our prototype's case, but you could solder the wires directly to the
appropriate points on the circuit board, tie strain reliefs on the wires, and then solder alligator clips to the ends
of the wires. However, a set of good leads are really not all that expensive and it does give the tester more flexible
usage as you have the opportunity to use a variety of different leads to suit your purpose.
The nine-volt (alkaline) battery is secured to the side of the case with a clip or use a holder. Your completed
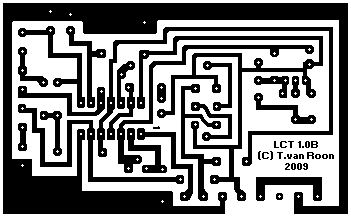
Printed Circuit Board should appear as shown in Fig. 5., or if you have a previous version
of the pcb (8 and earlier) then see the layout at the bottom of this page.
Usage Hints:
Set S1 for short or open depending on the condition to be tested. Then connect the test leads across the
circuit to be tested. If an intermittent condition is detected, the LED will illuminate, and the buzzer will sound
(if S4 is on). If you don't remove the test leads (assuming if S2 is set for AUTO Reset, the LED will flash
(very fast)and audio will warble at a rate determined by the reset circuit. On a 'zero' ohm short the led will flicker,
indicating a direct connection or short.
It is very important that the test leads make a positive connection with the circuit to be tested. In fact, clips should
be used instead of test leads. There are good test leads available for about $15 which are hardened stainless-steel
and have sharpened points which were my personal choice. This detector is so sensitive that, when it is initially
connected across a long length of parallel wires or traces, it may latch due to capacitance between the wires. As a
matter of fact, it happens with my model all the time. Just press the reset switch S3 (if in manual mode) when that
occurs.
 Parts List
   R1 = 10K                            IC1 = 4093B Quad Nand Schmitt Trigger
R2,R3 = 470K                         D1,D2 = 1N914, signal diodes
   R4 = 100K Trim-pot (Bourns 3386)   LED1 = Red, 5mm, High Brightness
   R5 = Not used (prototype)           BZ1 = Piezo Buzzer (PT-1550W) or AT-150
   R6 = 1.8K (1800 ohm)                 S1 = DPDT, miniature toggle
  *R7 = 1M Potmeter (Lin)         S2,S4,S5 = SPDT, miniature toggle
   R8 = 10M                             S3 = SPST, momentary push, normally open
   C1 = 0.1uF, ceramic         Additionally: IC socket, case (4.75"x2.5"x1.5"),
C2,C4 = 0.01uF ceramic                       9V battery clip, banana jacks, knob
   C3 = 4.7uF/16V, Elec.                     for R7, enclosure (Hammond 1591-D)

For the diagram and parts for the AT-121 piezo buzzer, check this circuit: [AT-121 Driver Circuit parts]

A complete KIT for this tester is available. [Click Here]

Note: You can use any type, regular switch, and they are fine (and cheaper)
      just more soldering and more wires.  On the other hand, you can
      customize the look like I did with the rocker switch/led, and the
      rectangular indicator Led.
Optional:
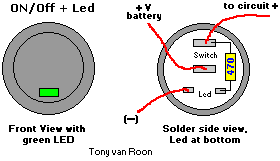
I used a rocker type on-off switch with led indicator (in my second unit), for a more professional look. The drawing below shows
how to hook it up just in case you're starting out in electronics.
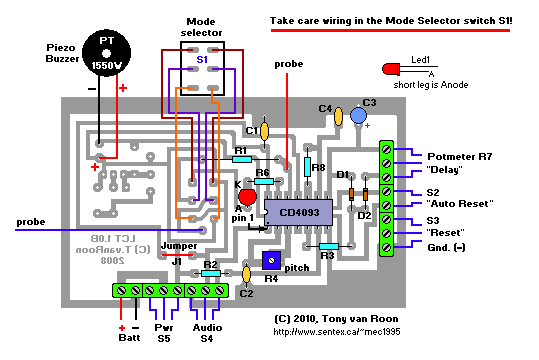
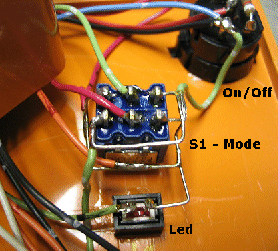
Above photo (left) is obsolete 7-20-2010 but shows how the mode switch S1 was wired up. Almost all problems send to
me via email contained: "my tester doesn't work" and are related to faulty wiring of this switch. Pay some good attention
to it!
All parts can be easily obtained via Digikey, Mouser, Newark, Radio Shack, or available here in the form of a building
KIT. I'm fine-tuning this project at this time. There are a couple of extra holes on the pcb meant for the driver circuit.
Ignore them if you ordered the kit with pcb version 9.0. When you're done soldering everything up check your wiring
before connecting the battery. Especially with the switches (5) it is very easy to make a wiring error.
Good luck and have fun building this most versatile project.
ALWAYS check for the latest PCB 'Revision' number (currently 7-20-2010, Rev. 1.0B).
Updates/Modifications:
10-25-2005 - o Modified PCB for use with a regular trimmer potentiometer made by
               Bourns (R4).
             o Note also that you may have to drill an extra hole and solder a
               wire from the walker to the leg of the trimmer-pot.
             o Pin '1' on the printed circuit board was labeled incorrectly
               (up-side-down). This pin only goes to the Audio Switch S4.  Not
               connected to the trimmer pot.
             o PCB: pin 2 of the IC goes to the trimmer pot and capacitor C2.
               Previously this pin was not connected at all.
11-09-2005   o Updated pcb again to facilitate both vertical and horizontal
               types for the Bourns trimmer pot. Revision # updated to 7.
 1-28-2006   o Modified PCB. Trimmer pot holes were still 2 pixels too small.
               PCB trace missing between S5 and R2.
12-10-2006   o Readjusted the pads for S1 and made some cosmetic changes.  Added
               driver circuit for alternate piezo AT-121 (3-leads).
               Revision updated to '9'.  Current PCB batch on-line is still 8.0
 5-25-2007   o Created new 'Parts Lay-out' for version 9.0.  Switch S1 is no
               longer part of the pcb, but the pcb has been changed to include
               the two jumper wires on the switch which caused many confusion.
12-04-2008   o Printed Circuit Board revision number is now 9.
 5-05-2009   o Working on new PCB to make wiring up easy.
 7-20-2010   o New PCB and Layout. Rev.1.0B.
               Kits may have new or previous version or both.
Copyright and Credits:
The original article and idea is copyright © by Eldon L. Knight (1986).
Document updates and modifications, all diagrams/schematics, photos, Printed Circuit Board and Layout,
© 2002 by Tony van Roon.
Back to Circuits page
Copyright © 2002 - Tony van Roon
Last updated: August 12, 2010