
Parts List:
R1 = 1K C1,C2 = 0.01uF (10 nanoFarad)
R2 = 150 ohm T1 = 2N2219(A), NTE123, or TUN
R3 = 150 ohm D1 = 1N914
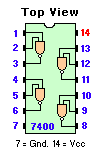
R4 = 3K3 IC1 = 7400, quad 2-input NAND gate
R5 = 20K IC2 = 555, timer/oscillator
R6 = 390 ohm Led 1,2,3 = Red,Green, Yellow. Ultra bright, 3mm
R7 = 150 ohm S1 = Switch, on-off
Error Fix: The position of the toggle switch (S1) was repositioned
to before the 20K resistor R5. I have not tried this modification myself. Fix was suggested by
Steve Main from
Caspan Scripts who indicated that this was the only
way the circuit would work as described below.
Description:
One of the most frustrating problems with
experimenting is not be able to check the logic state of TTL or CMOS ic's without the use of a triggered oscilloscope.
The schematic diagram above shows a simple and inexpensive way of building a 'Logic Probe' yourself. It will provide
you with three visible indicators; "Logic 1" (+, red led), "Logic 0" (-, green led), and "Pulse" (yellow led).
The yellow or 'pulse' led comes on for
approximately 200 mSec to indicate a pulse without regards to its width. This feature enables one to observe a
short-duration pulse that would otherwise not be seen on the logic 1 and 0 led's. A small switch (subminiature slide
or momentary push) across the 20K resistor can be used to keep this "pulse" led on permanently after a pulse occurs.
In operation, for a logic 0 input signal, both the '0' led and the pulse led will come 'ON', but the 'pulse' led will
go off after 200 mSec. The logic levels are detected via resistor R1 (1K), then amplified by T1 (NPN, Si-AF
Preamplifier/Driver), and selected by the 7400 IC for what they are. Diode D1 is a small signal diode to protect the
7400 and the leds from excessive inverse voltages during capacitor discharge. The 7400 can also be a 'LS' type or
whatever or any replacement.
For a logic '1' input, only the logic '1' led
(red) will be 'ON'. With the switch closed, the circuit will indicate whether a negative-going or positive-going pulse
has occurred. If the pulse is positive-going, both the '0' and 'pulse' led's will be on. If the pulse is
negative-going, the '1' and 'pulse' led's will be on.
I have build mine into a short, but thick,
magic-black marker. The probe-tip is made of a piece of piano wire. Have fun building it and make it part of your
trouble-shooting equipment. Mine has been in operation since 1987!
Back to Circuits page
Page Copyright © 1995 - Tony van Roon