Dot/Bar Rx Voltmeter
by Tony van Roon
BUGFIX:
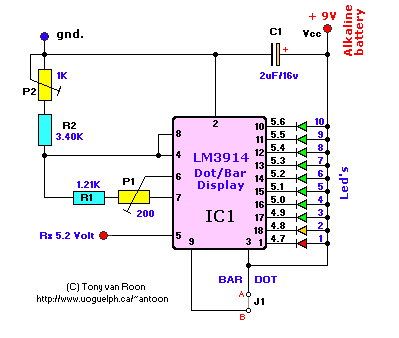
Pin 3 error: Pin 3 goes to Vcc and point 'A'. Not pin 11 as previously indicated (Thanks Petr). I will redesign
the circuit shortly and do away with the 1% resistors and the tantalum cap.
Parts & Description:
R1 = 1.21K - 1%, precision
R2 = 3.40K - 1%, precision
P1 = Trimmer-pot, 200 Ohm
P2 = Trimmer-pot, 1K
C1 = 1.5 - 2.2µF/16V (Tantalum or low leakage)
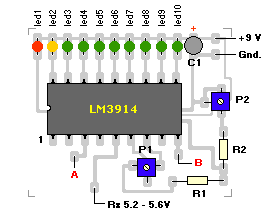
IC1 = LM3914 - Dot/Bar Display Driver
Leds = 8 Green, 1 Yellow, 1 Red, ultra-bright, 3mm
J1 = Jumper for either Dot or Bar display
MISC = 9 volt alkaline battery (no nicad!)
Final Notes:
This circuit was designed to work with a nine volt alkaline battery but can be modified to work with 4.5 -
25 volt. Over 10 volt increase potentiometer P2 to 2000 ohm. For voltages over 12volt you have to experiment with a
different value. Don't get confused between the Vcc (pin 3) and Signal Input (pin 5) voltages. Vcc is your supply
voltage and the Signal Input is where you put whatever you wish to monitor, which is in my case the receiver nicad
battery pack in my helicopter.
Place a digital voltmeter between pins 4 (Divider Low) and 6 (Divider High) and adjust P1 for 1.20 volt. Then connect
a power-source (like a powersupply) of 5.6V to Rx input (pin 5) and adjust P2 until the red led just lights up.
Disconnect the power-source and connect a fully charged receiver battery pack. At full charge LED 10 or 9 should be
on. Keep adjusting unil *YOU* are satisfied. If you want a more precise adjustment, get 10-turn trimmer pots.
This project works quite good when build on perforated board. LED 1 is Red, LED 2 is Yellow,
LED 3-10 are Green. But then again, choose whatever led-color scheme you like. The
yellow and green leds use a bit more current than the red.
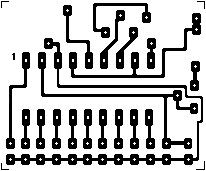
In regards to the pcboard; it is not to scale. It is approximately twice the size of the original (couple pixels
bigger). If you choose another voltage than the 9Volt adjust the R1/R2 value and the voltage of C1 values
accordingly.
For those who like to use a printed circuit board, use the suggested one below...
Back to Gadgets Menu page
Copyright © Tony van Roon, 1996