R/C Receiver Backup Power
by Tony van Roon
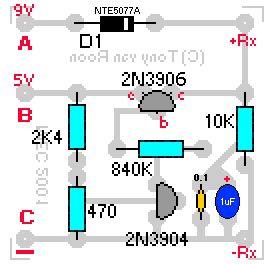
![[Receiver backup power]](rxback0.gif)
Parts List:
R1 = 10K
R2 = 840K
R3 = 2K4 (2400 ohm)
R4 = 470 ohm
D1 = 1N4168, 1N4746, or NTE5077A. 18V Zener, glass-type
C1 = 1uF/25v, Tantalum
C2 = 0.1uF (100nF), ceramic
T1 = 2N3906, PNP, AF/RF Amp (NTE159)
T2 = 2N3904, NPN, RF Amp/Switch (NTE123AP)

Description
You will also need a 9v battery + battery clip. NiCad or Alkaline works fine. Keep in mind that the so-called '9-volt'
NiCad battery does not actually contain 9-volts but rather between 7.6 and 8 volts. A 9V NiCad contains 6 cells of
1.25V each (6 x 1.25 = 7.5V). Don't trust them. Use NiMh instead, they are very reliable.
Adjust R1 to 8K2 (8200) ohm if you are using the 9-volt NiCad type. For backup power the regular 9 volt Alkaline
battery is just fine.
CAUTION: In regards to the Alkaline battery type, for this particular application
I recommend a type from a reliable source; Energizer, Duracell, Panasonic, Sony, etc. all good. Don't use any of the
'Made in China' battery types in your (expensive) aircraft.
A PCB is provided but not really necessary since this circuit can easily be built on vero-board or the 'Experimenters
PCB' from Radio Shack.
As long as there is enough power supplied to the +Vcc input, T1 and T2 are biased and filter out to '+ Out' while
blocking the 9-volt via D1 and R1. The purpose of R1 is only to bring the 9-volt to an acceptable voltage-level for
the receiver. When the battery-pack gets below 4.8V, the voltage divider over T2 will be reversed biased and make
T1 block the '+Vcc In'. This will allow D1 via R1 to bias and provide the necessary backup power. For T1, a NTE129 may
work also. One more thing about T2, the replacement type is NTE123AP. The regular 'A' type will not work.
In the event you are unable to obtain the transistors above, I have included a second version (below) for either a
second 4.8V battery pack or 9V battery.
NO MATTER WHAT YOU PLUG INTO YOUR RECEIVER, TEST IT FIRST!
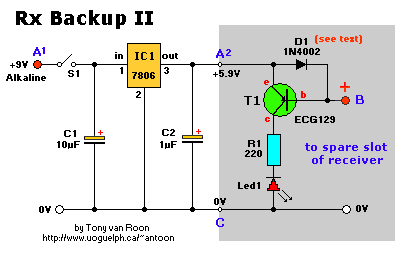
Parts List:
  R1 = 100 - 220 Ohm
  D1 = 1N4002 (see text)
  C1 = 10uF/25v
  C2 = 1uF/16V
Led1 = LED, 5mm, Ultra or High Brightness
  T1 = ECG129 or NTE129, PNP
 IC1 = 7806 Positive Voltage Regular (see text)
Description
This circuit is very simple and works just as good with a minimum of components. If you wish to use a 9-Volt Alkaline
battery you just build the whole circuit as shown. If you wish to use it with a second 4.8 battery back, you can
eliminate C1, C2 and IC1 and go directly to the circuit in the gray-shaded area.
The backup-battery starts to activate when the main battery pack falls below 4.7 volt, and provides full power at
4.6 volt. This fact is indicated by the illumination of Led1 via R1. Depending on the type of LED you're using,
you may need to experiment with the value of R1. The Ultra-Bright LED I'm using required a 220-ohm resistor for R1.
Select a value anywhere between 100 - 330 ohm.
You can use a 3-volt buzzer also instead, just replace Led1 & R1 with the buzzer. Another diode and capacitor may be
needed over the '+' and '-' of the buzzer to filter out transients. A 1N4148 diode and a 100nF ceramic capacitor will
most likely be sufficient. I personally favor the high brightness Led since I fly helicopter and wouldn't be able to
hear the buzzer anyway because of the noise from the blades. Your choice.
In regards to transistor T1, which is a general purpose fast-switch/driver; the ECG129/NTE129 worked fine. I noticed
while experimenting that not all transistors behave the same in regards to activating the backup-battery at a
certain voltage level. Any PNP fast-switch type will probably work. Check ECG & NTE
for reference information.
The IC1 regulator is a 6-volt type in a TO-220 case. The general purpose 1N4002 (D1) takes a voltage drop of 0.7V making
the output a total of 5.3V. Okay for most receivers but check yourself. Some 'cheapie' receivers have a max of 5V, but
receivers can handle 5.6 volts. If your receiver is manufactured to work on 6 volt, change D1 for a schottky diode
which has a lower voltage drop.
The 9-volt Alkaline battery is connected between the 'A1' point and '0' volt. A regular 4.8 volt battery pack is
connected to 'A2' and '0' volt and components not shown in the gray-shaded area eliminated. Point 'B' and '0' volt
goes into a spare slot of your receiver. Before plugging the circuit into your expensive receiver, verify that the
voltage on point A2 and 0 is about 5.97V (or better) for the 7806 and 4.97 (or better) for the 7805 regulator.
To check the working of your backup circuit, make sure both the main and backup packs are plugged into the receiver.
If you switch the main battery pack off (via the switch harness) the led will light and indicate that 'backup is
provided'. Of course, you should have another switch for the backup battery otherwise your receiver would be always
'on'.
CAUTION: In regards to the Alkaline battery type, for this particular application
I recommend a type from a reliable source; Energizer, Duracell, Panasonic, Sony, etc. all good. Don't use any of the
'Made in China', Korean, or Taiwan, battery types in your (expensive) aircraft. Although no doubt the crash will be
spectacular, skimping on a reliable battery is not worth it!
Because of the simplicity of this circuit, there is no need for a circuit board. Use vero-board or something.
AGAIN -- NO MATTER WHAT YOU PLUG INTO YOUR RECEIVER, TEST IT FIRST!
Back to Gadgets Menu page
Copyright © 1999 - Tony van Roon