Copyright 1995 Mark E Johnson. All rights reserved.
Parts Needed
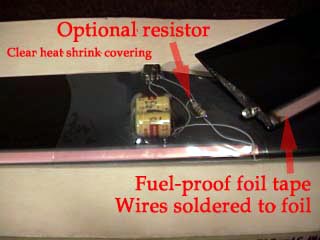
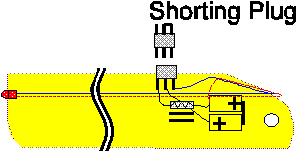
Be very careful to avoid shorting the batteries. The wire is routed through the middle of the blade if using G-Blades, or through a shallow trench on wood blades. If you are using metal foil, then you can carefully run it along the top and bottom leading edge of the blade. The components are mounted on the blade with "Shoe-Goo" style cement, and covered with heat shrink tubing. The Shorting Plug is the switch for the blade which finishes the connection between the + side of the battery and the anode of the LED. Mount a female Deans to the trailing edge of the blade and solder a short wire across the two matching pins on the male connector to make the shorting plug. If you want to be on the safe side, then add a 220 ohm resistor in series with the LED as shown in the drawing. I didn't for maximum brightness, and I haven't burned out an LED yet. The LED's have a 250 mph airstream to keep them cool.
Night flying is a lot easier than it looks. Besides the blades, you also need one light on each skid, and at least one on the tail boom. The simplest light source are Cyalume lightsticks, sold in camping and outdoor stores. Use nylon zip-ties to fasten a Cyalume to each skid, and one to the tail boom near the tail. I prefer a light on the top of the boom and one on the bottom. I also prefer the tail boom light be a different color than the lights on the skids.
Selection of flying site is important. The ideal site is flat with no obstacles, and no bright lights nearby. The darker it is outside the better. Lights on the horizon from streetlights or buildings can be very distracting. Watch out for nearby roads which offer the hazard of bright headlights.
The major thing to remember is that the ground is there, you just can't see it! Your buddy can stand by with a flashlite to iluminate the area when starting the heli, and also to to iluminate the landing area. Take it easy at first, and in no time you'll be doing all the maneuvers that you normally do during the day.
Warning, this will not work in cold weather
Items Needed
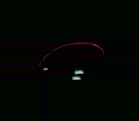
The G-Blade is the key to simplicity. Gary Wright flew a magnificent flight at the IRCHA Jamboree, grabbing first place using the procedure outlined here. What makes the G-Blade so special is that it's transparent and hollow, and it's actually designed to be able to hold a milliliter or so of liquid that can be injected through a pre-drilled hole in the root of the blade. 1cc of Cyalume liquid injected into the blade will collect at the tip when the rotor speeds up, and light the blade tips enough to show a clearly visible "Hula-Hoop" on a dark night. You should also attach a Cyalume lightstick to each of the skids, and at least one to the tail fin. This will provide the visual cue so you will always know the orientation of the helicopter.
Steps for G-Blades
For additional information contact Mark Johnson via E-Mail at
[email protected] or Compuserve user 73577,1302.
Anonymous FTP at ftp.minn.net/usr/mjohnson