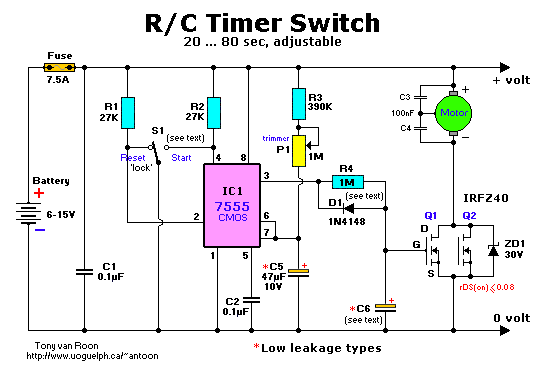
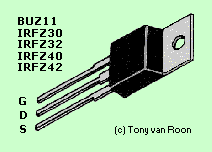
R/C Timer Switch Circuit Diagram

by Vic Smeed


The project started with a request from a fellow member of the Long Eaton Club, Tony Bowler. He was interested in converting one of the 'Golden Oldies' to electric free-flight. He choose Vic Smeed's "Debutante" to power with seven AE size cells and a Speed-400 motor, but realized he required some sort of timer to give a predetermined motor run, and asked if I could help. The design I came up with seems to fit the bill. It will switch up to 12 amps, has an optional soft-start for gear box applications, is simple to construct and all the bits are readily available from Maplins for under $10. The 'ON' time is adjustable from 20 to 80 seconds, but other variations of the running time can be achieved.

Circuit Description:
The heart of the circuit is the popular CMOS Timer IC, 7555. When power is applied from the battery, the IC's output pin 3 is switched 'OFF' (0V) and a short circuit applied to C5, thus ensuring it is completely discharged. When a momentary start signal is applied to pin 2, the output immediately switches 'ON' (+V), thus switching on the MOSFETs and the motor via the soft start circuit R4, D1 and C6 (if fitted). This latter circuit slows down the switching on of the MOSFETs, giving a more gradual increase in current to the motor. If soft start is not required, omit these components and wire pin 3 directly to the MOSFET gate terminals G.
The start signal also causes the IC to remove the short circuit from C5, allowing it to charge up towards +V via the timing resistors R3 and P1.
When the voltage across C5 reaches 2/3V, the IC detects this and its output switches 'OFF', thus immediately switching the MOSFETs and the motor off via D1. The 7555 timer IC also re-applies the short across C5 and the circuit returns to its initial condition ready for the next motor run.
Applying a Reset signal to pin 4 (either momentarily or permanently) will return the circuit to its initial 'OFF' state at any part of the 'ON' cycle.
Zener diode D2 provides protection to the MOSFETs from the high frequency transients that all DC motors generate, but do not omit the normal spark suppression capacitors C3 and C4 wired directly from the motor terminals to its case (0.1uF ceramic disc types are fine).

Components and construction:
Parts List:
All resistors 1/8 watt & 5% tolerance (or less), unless otherwise noted.

      R1,R2 = 27K  BUZ11, IRFZ30/32/40/42 pin-out
         R3 = 390K            
         R4 = 1M                     
         P1 = 1M, trimmer
C1,C2,C3,C4 = 0.1uF (100nF)
         C5 = 47uF/10V, low-leakage electrolytic
         C6 = (optional)
         D1 = 1N4148, 1N914, or equivalent
        ZD1 = Zener Diode, 30V
        IC1 = 7555 CMOS Timer
      Q1,Q2 = BUZ11 MOSFET, or equivalent
         S1 = on-off-on switch (see text)
       Fuse = 7.5A
		
Parts Description: As stated in the parts list above the 1/8 watt resistors are of sufficient wattage to do the job.
C1 to C4 are of the ceramic 50V types. C5 has to be a low-leakage type like tantalum or something. C6 an is optional electrolytic type and no exact value is specified; it depends on the 'Soft-Start' part of the circuit and quantity of MOSFETs you stack in parallel. Start with 22µF and increase the value if needed.
The 7.5Amp fuse is the regular flat automotive kind.
S1 is a special toggle switch which locks on one-side to prevent accidental injury by flipping the switch to the 'start' position when you're not ready yet. Or fabricate some sort of 'power-disable' thingy if you are unable to obtain this switch. The switch should be the on-center-on type.
Q1 & Q2 are BUZ11, N-channel, Power, HiSpeed Switch, TMOS Fets, each at about 25A each. Substitutes are fine as long as you keep the rDS switch-on resistance of 0.05 ohms or less in mind or you may find that the circuit will switch on fine but does not switch off after the pre-determined time you have set it for with trimmer pot P1. For example, the IRFZ30, IRFZ32, IRFZ40, or IRFZ42 are good choices with an rDS(on) of 0.05, 0.08, 0.028, and 0.035 ohms. These type mosfets have a so-called 'Power Enhancement Mode' feature. Especially the IRFZ40/IRFZ42 are 46/51Amps which probably allows you to get away with one mosfet only. They are however a bit more expensive.
R4, D1, and C6 are optional for a soft start. If you don't require the soft-start then leave them out. C3 & C4 are wired straight across the motor terminals for spark suppression which every electric motor generates. Not needed of course (but does no harm) if you use a brushless motor. The 30V zener diode D2 is to protect the mosfets from transients.
It is recommended you use a CMOS timer for IC1 because the regular bipolar 555 uses too much current.
Your choice of substitutes for Q1 and Q2, if you can't find the BUZ11, has to switch comfortably 6 amps each. That is 12 amps total. If more output current is needed for a different motor than the Speed-400 and others, fit more mosfets in parallel by stacking them together on top of each other with small aluminum pieces, no heatsink is required. The IRFZ40 would work fine, or the NTE2389.

As I mentioned before, MANY other N-Channel MOSFETS are suitable if they have a maximum 'ON' resistance of approximately 0.05 ohms (0.08 ohms is fine) and can handle the required current. If you wish to change the "ON" time to suit your needs, use this formula:
T = 1.1 x C5 x (R3 + P1)

where T is in seconds, C is in microFarads, and R in Mega ohms, e.i. with P1 set to 0 ohms. The minimum time can be set by R3 + P1. If only a fixed time is required, omit P1 and set it by a value of R3. As the 'OFF' current is only about 0.5 milliAmps it is not necessary to disconnect the battery between flights, but do so at the end of a session.

This is such a very simple circuit it can be easily and smaller soldered onto a piece of perfboard using point-to-point wiring with at least 0.4mm wire. So there is no pcb available and I don't have plans to make one. The layout suggestion, however, gives you an idea how to best place the components but feel free to use whatever other layout you have in mind.

R/C Timer-Switch Layout Diagram 
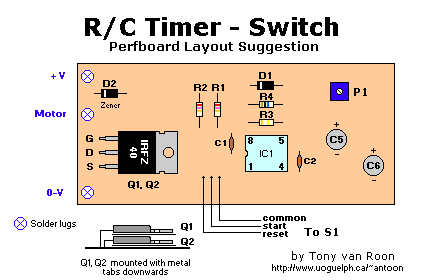
Final Word: Once you flip the switch to 'Start' and let go of the aircraft you have very little control. It is imperative to fit a fuse to prevent burn-outs of the electric motor, battery, or plane if the thing noses in and the prop stalls. The 7.5 amp flat automotive fuse is suitable for most applications using the Speed 400. Adjust the fuse to a higher value if you use a Speed 600 or better motor.
As specified in the 'Parts Description' section, switch S1 is a center-off change over with the Start side non-locking. Again, if you are unable to obtain a locking-switch, tinker something else together to prevent personal injury from accidental activation of the motor.
CAUTION! CMOS and MOSFET devices are static sensitive and WILL be damaged by zapping them with ESD (Electro Static Discharge) coming from handling these parts with your unprotective hands. Leave them in the anti-static bags in which they are sold to you until you need them. Be also aware if a sales clerk from an electronics store tries to sell you these devices not packaged in some sort of anti-static packaging. Just refuse the sale and ask for a properly packaged item.

Testing: Re-check your whole project against the circuit diagram, check wiring, and check again. For an initial test, use a low-wattage automotive bulb in place of the motor. Connect the battery (watch polarity), the bulb should be off. Set P1 to minimum and momentarily throw S1 to 'Start'. The bulb should be switched ON (if the soft start components are installed there will be a short delay) and remain on for approximately 20 seconds. Set P1 to maximum and repeat the procedure above, the bulb should stay on for about 80 seconds. Keep in mind that these times are approximate, due the tolerance of components used especially C5. At any time in the ON period, the bulb should switch OFF when S1 is operated to the RESET position. Replace the bulb with the motor and prop of your choice, and run the cycle again. The MOSFET's should remain cool during the entire maximum motor run.

Drive/Gearbox Ratios
The following current consumptions may be of interest, they were taken with standard 7.2V Simprop Power 400 running on 7-cells (8.4V) and turning an assortment of plastic props.


Copyright and credits:
This article was originally written by the author Vic Smeed and published in one of the British R/C hobby magazines (can't remember which one, or even the year of publishing). He used this system in his "Debutante" airplane. So, all credits go to the author.


Back to Gadgets Menu page
Page copyright © 1999 Tony van Roon