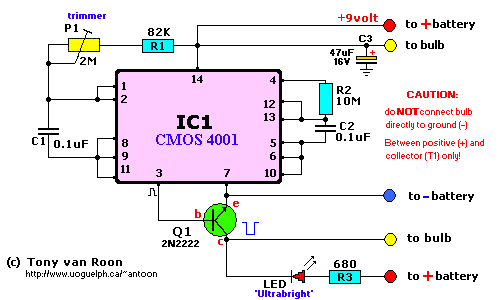
Tail Anti-Collision Light
by Tony van Roon
 Parts List:
All resistors are 1/4 watt, 5%. Unless otherwise posted.

   R1 = 82K
   R2 = 10M
   R3 = 680 Ohm
   P1 = 2 Meg (10-turn trimmer)
C1/C2 = 0.1 uF, Ceramic (100 nanoFarad)
   C3 = 0.01 uF, Ceramic (10nF, not shown in diagram, see note)
  LED = Red, Ultra Bright or substitute with 1N4148 diode or Schottky type
   Q1 = 2N2222(A) (see below for other replacements
   U1 = CD4001B, MC14001B, or equivalent CMOS (quad 2-input NOR)
 BULB = Miniature high brightness light bulb, 5v/15ma (9V) or Ultra-Bright LED's.
        Substitute with 2 volt bulbs (Electro-Sonic #1784) if power source is
        6 volt or less.

A KIT for this project is available: [R/C Tail Light KIT]
Other substitutes for Q1 are listed below. Do NOT use the 2N3904, they don't work!
PN100, ECG128/NTE128, GE18, ECG123AP/NTE123AP, PN3646, 2N4401, MPSA14, etc.
Description:
Naturally this circuit is not the same as a strobe circuit and don't flashes as bright as a strobe, but pretty close.
I used a reflector out of an old miniature camera I picked up from the surplus store and mounted it inside the tail
after re-modeling the reflector a bit to suit the style of the tail.
The above circuit will support 1 or 2 bulbs and look like the real thing....CHEAP! Pulse brightness is adjustable with
P1 and Flash rate is steady at 50 flashes per minute or so. An Ultra Bright led is required.
LED's may be used instead of bulbs, but make sure P1 is turned CCW BEFORE
applying power to the circuit or LED's will burn to a crisp. I did some testing with several types of LED's and
different colors. Personally I prefer just the bulbs. If you need a red or green light just use some transparent paint
on them. Works! Do NOT connect the lights directly to ground! Which means,
don't connect directly to '+' and '-' but only '+' and 'c' of Q1.
Battery power can be from 4.8 to 15 volt, but 9 or 12 volt would be preferred. A standard 9-v alkaline battery should
work for a long time. Also, in the parts list, I mentioned that the 2mm red led can be substituted by a 1N4148 'signal'
diode. However, the led gives a visible indication of the proper operation of the circuit. Looking at the diagram,
the voltage 4.8 - 16volt mentioned shows the flexibility of the cmos IC, the bulbs work better between 9-12volt.
(remember to get different bulbs if voltage is less than 6v).
This device was tested for interference with JR, Futaba, HiTec, Airtronics, and ACE radio equipment. None were found.
I suggest, however, to keep the device away from receiver and servos
I do not recommend using your receiver pack (4.8v) to power both receiver and
this circuit. Use a 9V setup for best results. Click here to see the data sheet on the MC14001B.
Note:
Also, you can use a decoupling capacitor close to the IC. Solder a 10nF ceramic type (0.01) between pins 7 and 14.
Testing and Setup
Before hooking up the lights and all the wires and what not, you should pre-test
the circuit for proper operation as I know by experience that depending on the led type it (cathode/anode) may have
to be reversed. Meaning, if the led does not flash, desolder the led connections and put it the other way (cathode to
base of Q1). As mentioned before, an "Ultra-Bright" or "High-Brightness" type of LED is needed. The reason for this
is that the current pulse coming from the led triggers the base of Transistor Q1 and the collector of Q1 is feeding
your lights which determines the intensity of the flash, with a regular led there is not enough power to bias Q1. My
personal preference are the miniature bulbs. Anyways, enjoy!
Trouble Shooting
Hope it does not get to this point but it happens and is possible. Most 'does-not-work' circuit problems come from
wiring errors, missing a connection, or damaging/destroying a cmos device while handling and/or soldering it in place.
See if you get a pulse from pin 3. No? Disconnect the battery and desolder the led. Connect the battery again and check
for a pulse on pin 3. Yes? You have something connected wrong after pin 3, maybe the led leads need to be reversed.
No? You either made a wiring error or damaged the 4001 cmos ic. Check all your wiring carefully. Before replacing
the 4001 cmos ic make sure to remove the power and all static from your hands by touching ground for a couple seconds...
Back to Gadgets Menu page
Copyright © 1996, Tony van Roon

