Home » Circuits
Sleeping Aid Schematic - Circuit Diagram
Based on electromagnetic-field radiation, Place it under the pillow - Built-in timer
Many people experienced sleeping well in natural surroundings, into a tent or a wooden hut. This fact is due not only to the healthy atmosphere but also from our unconscious ability to perceive natural Earth's magnetic-fields. The circuit generates this type of Geo-magnetic-fields and lets us perceive them: in this manner our brain is surrounded by an ideal environment for a sound sleep. (N.B. Basic ideas for this circuit are coming from German papers).
Circuit operation:
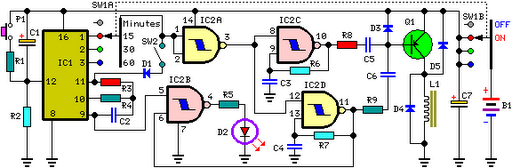
IC2C and IC2D generate two square waves at about 1.2 and 5 Hz respectively. These wave-forms are converted into 60µS pulses at the same frequencies by means of C5 & C6 and mixed at Q1 Base. This transistor drives the Radiator coil with a scalar series of pulses of 60µS length and 9V amplitude. IC1, IC2A & IC2B form the timer section.
C1 & R2 provide auto-reset of IC1 at switch-on. The internal oscillator of IC1 drives the 14 stage ripple counter and, after about 15 minutes, output pin 1 goes high. Pin 3 of IC2A goes low and stops IC2C & IC2D oscillation. If SW2 is left open (Alternate mode operation), after 15 minutes pin 1 of IC1 goes low, pin 3 of IC2A goes high and oscillators are enabled again.
If SW2 is closed (Stop mode operation), the first time output pin 1 of IC1 goes high, the internal oscillator of the IC is disabled by means of D1. Therefore the circuit remains off until a reset pulse is applied to pin 12 by means of P1 or when the whole device is switched-off and then restarted. The same thing occurs when SW1 is switched on 30 or 60 minutes positions, obviously changing time length.
IC2B drives pilot LED D2 which operates in the following three modes:
- flashes quickly and almost randomly when the Radiator coil is driven
- flashes somewhat slowly and regularly when the Radiator coil is pausing during the Alternate mode operation
- is off when the circuit auto-stops (Stop mode operation)
Circuit diagram:
Parts:
R1 = 1K 1/4W Resistors
R2 = 10K 1/4W Resistor
R3 = 10M 1/4W Resistors
R4 = 2M2 1/4W Resistors
R5 = 1K 1/4W Resistors
R6 = 10M 1/4W Resistors
R7 = 2M2 1/4W Resistors
R8 = 4K7 1/4W Resistors
R9 = 4K7 1/4W Resistors
C1 = 47µF 25V Electrolytic Capacitors
C2 = 100nF 63V Polyester Capacitor
C3 = 330nF 63V Polyester Capacitors
C4 = 330nF 63V Polyester Capacitors
C5 = 15nF 63V Polyester Capacitors
C6 = 15nF 63V Polyester Capacitors
C7 = 47µF 25V Electrolytic Capacitors
D1 = 1N4148 75V 150mA Diodes
D2 = LED (any type) (see Notes)
D3 = 1N4148 75V 150mA Diodes
D4 = 1N4148 75V 150mA Diodes
D5 = 1N4148 75V 150mA Diodes
IC1 = 4060 14 stage ripple counter and oscillator IC
IC2 = 4093 Quad 2 input Schmitt NAND Gate IC
Q1 = BC327 45V 800mA PNP Transistor
L1 = Radiator coil (see Notes)
P1 = SPST Pushbutton
SW1 = 2 poles 4 ways rotary switch
SW2 = SPST Slider Switch
B1 = 9V PP3 Battery, Clip for PP3 Battery
Features:
- Generates a natural electromagnetic-field
- Makes easier to fall asleep
- Induces a prolonged and sound sleep without drugs
- No side effects
Use of this circuit:
- Select a timing option by means of the rotary switch SW1.
- Choose 15, 30 or 60 minutes operation.
- Select "Stop" or "Alternate" mode operation by means of SW2.
- With SW2 closed (Stop mode operation) the electromagnetic radiation stops after the pre-set time is elapsed.
- With SW2 opened (Alternate mode operation) the device operates for the pre-set time, then pauses for the same amount of time: this cycle repeats indefinitely.
- Place the unit under the pillow and sleep like a log.
- To reset a cycle press P1 pushbutton.
Notes:
- L1 is obtained by winding randomly 600 turns of 0.2 mm. enameled wire on a 6 mm. diameter, 40 mm. long, steel bolt. Secure the winding with insulating tape.
- Mean current drawing is about 7mA, decreasing to less than 4mA during pauses when in Alternate mode operation.
- Battery life can be dramatically increased omitting LED D2 and its associated resistor R5.
- Use a plastic box to enclose the circuit: metal cases can severely limit electromagnetic radiation.