Glowplug Driver for Radio Control
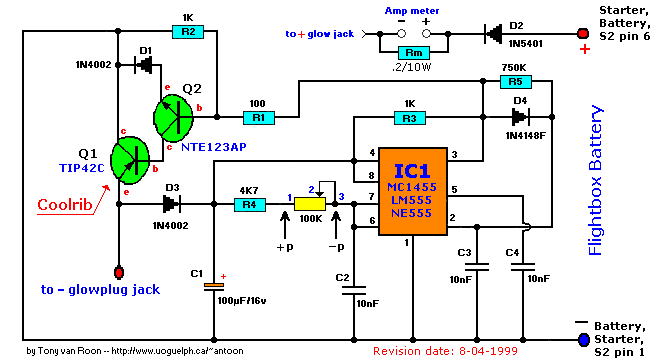
| All errors in circuit diagrams, documents and layout are corrected. The
circuit as shown below is functional and working. Note that Q2 is sensitive and easily destroyed by
wrong connection, shorts, over-voltage or too much current. What does that mean? If your circuit does not work
immediately and draws excessive amounts of current when you first try it you can easily assume that Q2 and
possibly T1 will be defective. I included a small list with possible replacements for the major components.
I tried a couple of them and seemed to work satisfactory. An email from Mo in England
indicates a logarithmic potentiometer is used to better control the current. It certainly does not harm to try
that and use whatever works for you.
|
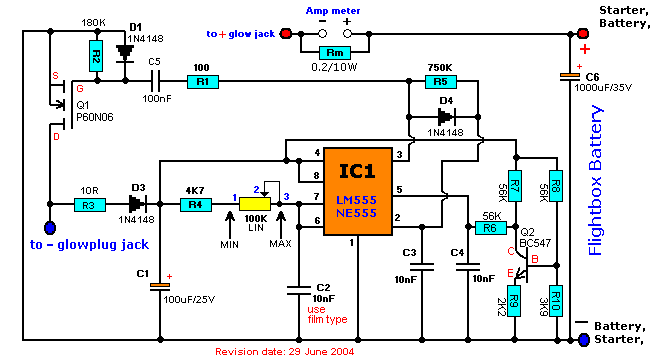
Above is a modified version. Much better control. Go to Thomas Scherrer's Website
in Denmark for more information, parts list, history, and pcb.
Parts List:

All resistors, except Rm, (metal-film recommended) 1/8 watt (1/4 watt for carbon)
& no less than 5% tolerance, unless otherwise posted.

   C1 = 100uF/16V Electrolytic   R1 = 100 Ohm, 1/2 watt    1 red jack
   C2 = 10nF, ceramic            R2 = 1K                   1 black jack
C3,C4 = 10nF, mica               R3 = 1K                   1 amp meter, 1 to 6-amp (dc)
   Q1 = TIP42C                   R4 = 4K7                  1 knob for potentiometer
   Q2 = NTE123AP                 R5 = 750K                 1 coolrib for Q1
   D2 = 1N5401                   Rm = .2 ohm/10W
D1,D3 = 1N4002                   P1 = 100K
   D4 = 1N4148F                  Here is a suggestion for a complete Power Panel
  IC1 = LM555

A couple possible substitutes, use at your disgression, no guarantees:
For Q1: TIP32C, TIP42, TIP42A (or B), NTE332, ECG332.
For Q2: 2N3904, BC547, (or A or B), BC550, European TUN.
For D1,3: NTE116, ECG116, try others.
For D2: NTE5801, try others.
For D4: NTE519, ECG519, other 1N4148x types worked also.
For IC1: NE555, TLC555, MC1455, HC555, NTE955M, ECG955, etc.
The NTE123A did not seem to work and is not quite the same as the 'AP' type.
The 2N2222(A) did not work in the prototype and shorted out the circuit.

The ECG and NTE/ECG substitutes are made by Sylvania (Philips). I build two units
and both working fine.
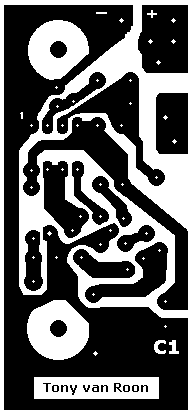
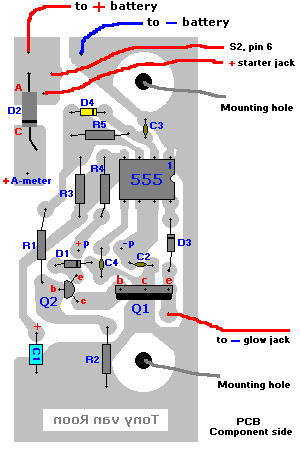
[Click here] to print an original size pcb (3 x 6cm).
Notes:
An on/off switch is not required for the glowplug driver since it only draws current when a glowplug is attached. As a
matter of fact, the circuit is only powered (via Q1) via a connected glowplug. Just in case you were wondering how
the positive (+) side of the circuit is connected. The starter motor runs directly from the flight box battery, via
the jacks on the power-panel, and has it's own on/off switch. Same scenario for the fuel pump, but includes a reverse
switch to pump the fuel in or out the tank/cannister.
For all components, substitutes are fine. D1 and D3 are regular 1N4002 diodes. You may substitute with the 1N4001,
or 1N4003. D4 (1N4148F) is an ultra-fast switching silicon diode with a 100V prv. The regular and more familiar
1N4148 seems to work also.
D2 (1N5401) is a 3A/100V prv power diode.
Q1 is a PNP power transistor/switch with a TO-220 case, 6A, 80/100V, 65 watts. Don't be afraid to experiment, and
don't forget the coolrib on the TIP42, it may be needed. I strongly recommend a power supply if you're gonna
experiment and turn up the voltage slowly while watching the ampmeter. My own experiments resulted in 3 burned out
glowplugs, 2 TIPs, and 2 NTE123AP. Q2 is a NPN silicon, AF/RF Amp/Driver, transistor to drive Q1. If you substitute,
stick with the 'driver' type, other may burn-out the very second you apply power. Again, try using whatever you
have in your parts-box first, but try to match the current/voltage parameters as close as you can and make sure it
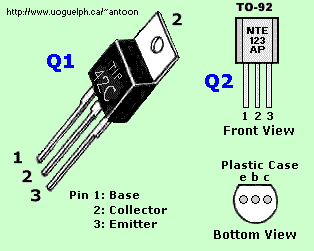
is able to drive Q1. Whatever transistor you use for Q1 or Q2, watch the orientation of the the emitter, base and
collector and don't assume it is the same as the original or as shown in the component layout. The tab for the metal
case transistors (Q2) is always the emitter. Remember, Q2, as mentioned before, should be a
driver-type-transistor (or close to it) in order for it to supply enough current to Q1.
All this circuit does, is providing enough controlled current (via P1) to make/keep a plug glowing under various
conditions.
In regards to the 750K value of R5, it is fine to combine different resistors to get to that value. I used two 1M5
resistors in parallel myself. Works fine! So does 680K+6M8 (754K).
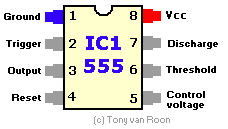
The CMOS timer, MC1455P, can
be substituted for the ordinary LM or NE555 and are pin-for-pin compatible. The CMOS version uses much less power and
its operating voltage is 2 - 18 volt versus the regular 555 type 4.5 - 18volt. On the other hand, the MC1455P is not
as robust as the regular 555 type. The amp meter is not mandatory, but gives you a nice visual indicator. It can easily
be constructed from a salvaged panel amp meter.
When a glowplug is hooked up (the plug act as an on/off switch to power the circuit), Q2 switches on and biases Q1,
which in turn provides enough current, adjusted with potentiometer P1, to make the plug glow. C2, C3, & C4 are
filtering capacitors while C1 keeps the voltage over the glowplug steady, like when the plug gets wet with fuel and
draws more current. Diodes D1/D3 are feedback blocking diodes preventing signal feedback.
CAUTION! The '-' of the glow plug jack connects to the emitter of Q1 only!
If you wish to incorporate the above into a complete Power
Panel check here for a possible suggestion on how to do that.
Back to Gadgets Menu page
Copyright © 1995, Tony van Roon


