Home » Circuits
Celsius Thermometer
The circuit of the Celsius thermometer in the diagram is based on the well-known Type LM334 from National Semiconductor. This IC is a sensor that provides a current which is directly proportional to the temperature in kelvin (K). Unfortunately, this is a quantity that is not suitable for use in most practical applications. In the circuit, therefore, the sensor is set to 1 µA K–1 with P1 and the offset of 273 K removed with P2. This renders the output voltage of the sensor directly proportional to the temperature in degrees Celsius (° C) and this makes the circuit suitable for a great many applications (since 1K=1° C). Circuit IC2 is arranged as a 2.5 V reference voltage source.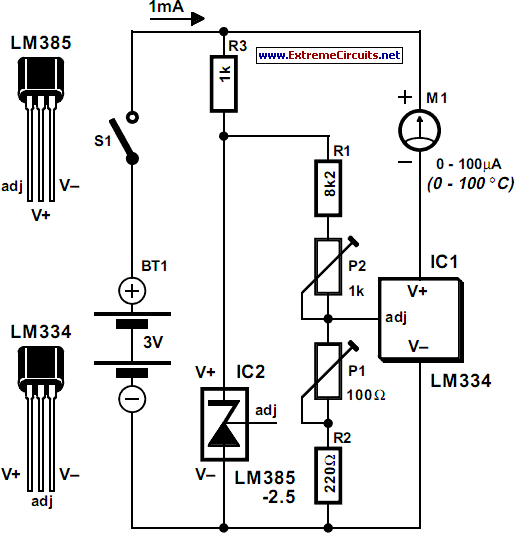
The current setting of the sensor is determined by the resistance between the adj(ust) pin and earth. If the earth is made virtual by raising the potential at the adj pin, the zero point can be shifted as desired. Calibration is best done by using a good domestic thermometer as reference. Start by short-circuiting IC2 and adjusting P1 until the reading of meter M1 shows a current value numerically equal to the ambient temperature plus 273. If, say, the room temperature is 25°C, adjust P1 until the meter reads 298 µA. Then, remove the short-circuit from IC2 and adjust P2 until the meter reads a current whose numerical value is equal to the room temperature, that is, 25 µA. The circuit draws a current not exceeding 1 mA, so using two AA size (AM3, MN1500, LR6, SP/HP7) batteries as power source will give a life of a couple of years.