Home » Circuits
Infra-red Light Barrier Using 555
This is a short-range light barrier for use as an intruder alarm in doorposts, etc. The 555 in the transmitter (Figure 1) oscillates at about 4.5 kHz, supplying pulses with a duty cycle of about 13% to keep power consumption within reason. Just about any infra-red LED (also called IRED) may be used. Suggested, commonly available types are the LD271 and SFH485. The exact pulse frequency is adjusted with preset P1. The LEDs are pulsed at a peak current of about 100 mA, determined by the 47 Ω series resistor. In the receiver (Figure 2), the maximum sensitivity of photo-diode D2 should occur at the wavelength of the IR LEDs used in the transmitter. You should be okay if you use an SFH205F, BPW34 or BP104. Note that the photo-diode is connected reverse-biased! So, if you measure about 0.45 V across this device, it is almost certainly fitted the wrong way around.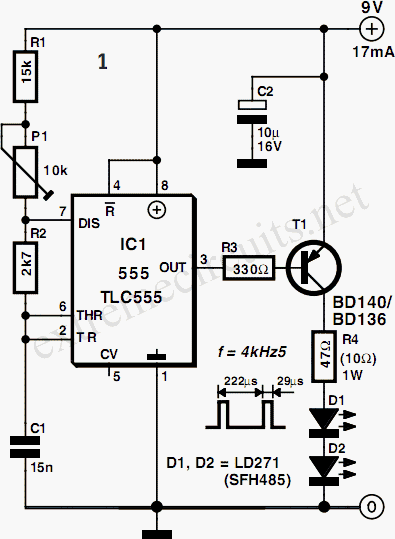 The received pulses are first amplified by T1 and T2. Next comes a PLL (phase lock loop) built with the reverenced NE567 (or LM567). The PLL chip pulls its output, pin 8, Low when it is locked onto the 4.5 kHz ‘tone’ received from the transmitter. When the (normally invisible) light beam is interrupted (for example, by someone walking into the room), the received signal disappears and IC1 will pull its output pin High. This enables oscillator IC2 in the receiver, and an audible alarm is produced. The two-transistor amplifier in the receiver is purposely over-driven to some extent to ensure that the duty cycle of the output pulses is roughly 50%.
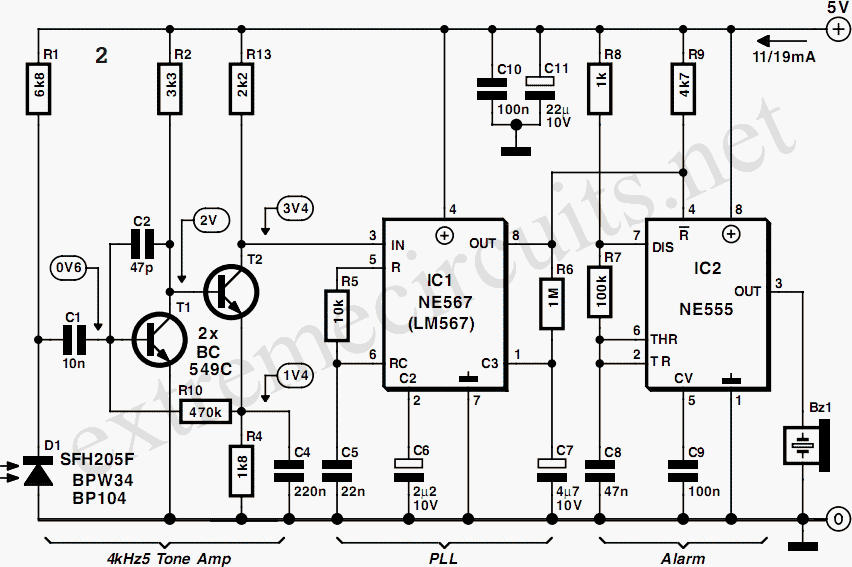 If the transmitter is too far away from the receiver, over-driving will no longer be guaranteed, hence IC1 will not be enabled by an alarm condition. If you want to get the most out of the circuit in respect of distance covered, start by modifying the value of R2 until the amplifier output signal again has a duty cycle of about 50%. The circuit is simple to adjust. Switch on the receiver, the buzzer should sound. Then switch on the transmitter. Point the transmitter LEDs to the receiver input. Use a relatively small distance, say, 30 cm. Adjust P1 on the transmitter until the buzzer is silenced. Switch the receiver off and on again a few times to make sure it locks onto the transmitter carrier under all circumstances. If necessary, re-adjust P1, slowly increasing the distance between the transmitter and the receiver.