Home » Circuits
Pipe Descaler
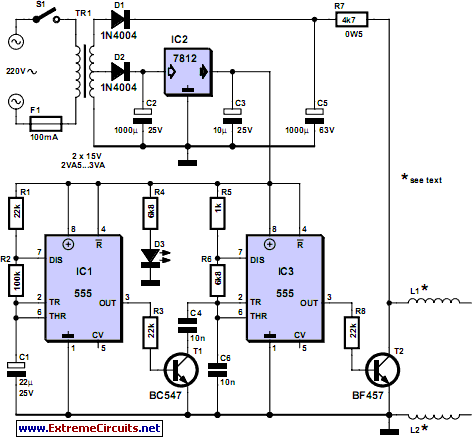
For many years now, magnetic (or electromagnetic) water descaler devices have been showing up on the shelves of Home Improvement and other DIY stores all over Europe. Despite the numerous studies completed on that subject, by manufacturers as well as by various consumer associations, none have been able to conclude on the efficiency of commercial pipe descalers in a decisive manner. Since electronic devices of this type are relatively expensive (especially when we discover what they are made of!), we decided to offer this project to our readers. For the price of a few tens of pounds, you will be able to evaluate the state of your own faucets, pots, and other pipes.The device we’re offering as a project is identical to top-of-the-line items found on sale; in other words, it includes the bi-frequency option because it seemed that would be the best way to fight lime scale deposits. An initial astable oscillator, based on a traditional 555, labeled IC3, functions at around 10 kHz when the only capacitor C6 is operating; in other words, when T1 is blocked. The latter is controlled by another astable oscillator, based on IC1 this time, but which functions at about 1 Hz. When T1 is turned on by IC1, capacitor C4 is effectively in parallel with C6 which divides the frequency produced by IC3 by two, i.e. to about 5 kHz. In order to have high amplitude signals, the power supply operates with a mid-point transformer utilized in an unconventional way, with simple half-wave rectification.
Circuit diagram:
The first half of the secondary delivers 15 VAC which, after being rectified, filtered and regulated by IC2, supply stable current of 12 VDC to supply power to the oscillators. The entire secondary makes it possible to have available, after rectification, approximately 40 VDC which is used to supply power to coils L1 and L2, wound around the pipe systems on which the assembly will work. To do that, IC3 is followed by high-voltage transistor T2 (a BF457 or equivalent) which chops this high voltage to 5 or 10 kHz frequency depending on the state of IC1. LED D3 lights up to signal that the power supply is present. Coils L1 and L2 are simple inductors made from insulated flexible wire, with about ten windings each.
They have to be wound around the pipes carrying the water to be ‘treated’ and are spaced about ten centimeters from each other. Neither the material of the pipe system, nor its diameter, should have any influence on the efficiency of the device. Paradoxically, these coils have one end in the air, which may surprise you as much as us but we indicated at the beginning of this article, that our goal with this project is not to explain the principle but rather to allow you to make the same device as those sold in stores, so that you can perform your own tests.
Author: Christian Tavernier - Copyright: Elektor Electronics Magazine

