PN junctions
Question 1:
| Don't just sit there! Build something!! |
Learning to mathematically analyze circuits requires much study and practice. Typically, students practice by working through lots of sample problems and checking their answers against those provided by the textbook or the instructor. While this is good, there is a much better way.
You will learn much more by actually building and analyzing real circuits, letting your test equipment provide the änswers" instead of a book or another person. For successful circuit-building exercises, follow these steps:
- 1.
- Carefully measure and record all component values prior to circuit construction, choosing resistor values high enough to make damage to any active components unlikely.
- 2.
- Draw the schematic diagram for the circuit to be analyzed.
- 3.
- Carefully build this circuit on a breadboard or other convenient medium.
- 4.
- Check the accuracy of the circuit's construction, following each wire to each connection point, and verifying these elements one-by-one on the diagram.
- 5.
- Mathematically analyze the circuit, solving for all voltage and current values.
- 6.
- Carefully measure all voltages and currents, to verify the accuracy of your analysis.
- 7.
- If there are any substantial errors (greater than a few percent), carefully check your circuit's construction against the diagram, then carefully re-calculate the values and re-measure.
When students are first learning about semiconductor devices, and are most likely to damage them by making improper connections in their circuits, I recommend they experiment with large, high-wattage components (1N4001 rectifying diodes, TO-220 or TO-3 case power transistors, etc.), and using dry-cell battery power sources rather than a benchtop power supply. This decreases the likelihood of component damage.
As usual, avoid very high and very low resistor values, to avoid measurement errors caused by meter "loading" (on the high end) and to avoid transistor burnout (on the low end). I recommend resistors between 1 kW and 100 kW.
One way you can save time and reduce the possibility of error is to begin with a very simple circuit and incrementally add components to increase its complexity after each analysis, rather than building a whole new circuit for each practice problem. Another time-saving technique is to re-use the same components in a variety of different circuit configurations. This way, you won't have to measure any component's value more than once.
Notes:
It has been my experience that students require much practice with circuit analysis to become proficient. To this end, instructors usually provide their students with lots of practice problems to work through, and provide answers for students to check their work against. While this approach makes students proficient in circuit theory, it fails to fully educate them.
Students don't just need mathematical practice. They also need real, hands-on practice building circuits and using test equipment. So, I suggest the following alternative approach: students should build their own "practice problems" with real components, and try to mathematically predict the various voltage and current values. This way, the mathematical theory "comes alive," and students gain practical proficiency they wouldn't gain merely by solving equations.
Another reason for following this method of practice is to teach students scientific method: the process of testing a hypothesis (in this case, mathematical predictions) by performing a real experiment. Students will also develop real troubleshooting skills as they occasionally make circuit construction errors.
Spend a few moments of time with your class to review some of the "rules" for building circuits before they begin. Discuss these issues with your students in the same Socratic manner you would normally discuss the worksheet questions, rather than simply telling them what they should and should not do. I never cease to be amazed at how poorly students grasp instructions when presented in a typical lecture (instructor monologue) format!
A note to those instructors who may complain about the "wasted" time required to have students build real circuits instead of just mathematically analyzing theoretical circuits:
What is the purpose of students taking your course?
If your students will be working with real circuits, then they should learn on real circuits whenever possible. If your goal is to educate theoretical physicists, then stick with abstract analysis, by all means! But most of us plan for our students to do something in the real world with the education we give them. The "wasted" time spent building real circuits will pay huge dividends when it comes time for them to apply their knowledge to practical problems.
Furthermore, having students build their own practice problems teaches them how to perform primary research, thus empowering them to continue their electrical/electronics education autonomously.
In most sciences, realistic experiments are much more difficult and expensive to set up than electrical circuits. Nuclear physics, biology, geology, and chemistry professors would just love to be able to have their students apply advanced mathematics to real experiments posing no safety hazard and costing less than a textbook. They can't, but you can. Exploit the convenience inherent to your science, and get those students of yours practicing their math on lots of real circuits!
Question 2:
The relationship between voltage and current for a PN junction is described by this equation, sometimes referred to as the "diode equation," or "Shockley's diode equation" after its discoverer:
|
Where,
ID = Current through the PN junction, in amps
IS = PN junction saturation current, in amps (typically 1 picoamp)
e = Euler's number � 2.718281828
q = Electron unit charge, 1.6 ×10⁻¹⁹ coulombs
VD = Voltage across the PN junction, in volts
N = Nonideality coefficient, or emission coefficient (typically between 1 and 2)
k = Boltzmann's constant, 1.38 ×10⁻²³
T = Junction temperature, degrees Kelvin
At first this equation may seem very daunting, until you realize that there are really only three variables in it: ID, VD, and T. All the other terms are constants. Since in most cases we assume temperature is fairly constant as well, we are really only dealing with two variables: diode current and diode voltage. Based on this realization, re-write the equation as a proportionality rather than an equality, showing how the two variables of diode current and voltage relate:
|
Based on this simplified equation, what would an I/V graph for a PN junction look like? How does this graph compare against the I/V graph for a resistor?

|
|
|
The graph described by the "diode formula" is a standard exponential curve, rising sharply as the independent variable (VD, in this case) increases. The corresponding graph for a resistor, of course, is linear.
Notes:
Ask your students to sketch their own renditions of an exponential curve on the whiteboard for all to see. Don't just let them get away with parroting the answer: Ït's an exponential curve."
Question 3:
The characteristically colored glow from a gas-discharge electric light is the result of energy emitted by electrons in the gas atoms as they fall from high-level ëxcited" states back to their natural ("ground") states. As a general rule of electron behavior, they must absorb energy from an external source to leap into a higher level, and they release that energy upon returning to their original level.
Given the existence of this phenomenon, what do you suspect might be occurring inside a PN junction as it conducts an electric current?
Follow-up question: what practical application can you think of for this phenomenon?
Notes:
The practical application of this phenomenon should be obvious, and it is very commonplace in modern electronic equipment. Discuss with your students the energy-efficiency of this light emission as compared to an incandescent lamp.
Question 4:
When "P" and "N" type semiconductor pieces are brought into close contact, free electrons from the "N" piece will rush over to fill holes in the "P" piece, creating a zone on both sides of the contact region devoid of charge carriers. What is this zone called, and what are its electrical characteristics?
Notes:
Students should know that both "N" and "P" type semiconductors are electrically conductive. So, when a depletion region forms in the contact zone between two differing semiconductor types, the conductivity from end-to-end must be affected. Ask your students what this effect is, and what factors may influence it.
Question 5:
What happens to the thickness of the depletion region in a PN junction when an external voltage is applied to it?
Notes:
Ask your students what effect this change in depletion layer thickness has on overall conductivity through the PN junction. Under what conditions will the conductivity be greatest, and under what conditions will the conductivity be least?
Question 6:
Shown here are two energy diagrams: one for a "P" type semiconducting material and another for an "N" type.
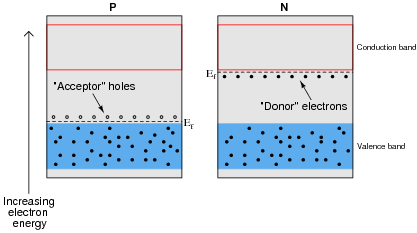
|
|
Next is an energy diagram showing the initial state when these two pieces of semiconducting material are brought into contact with each other. This is known as a flatband diagram:
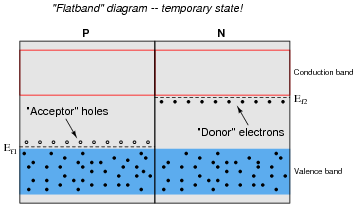
|
|
The state represented by the "flatband" diagram is most definitely a temporary one. The two different Fermi levels are incompatible with one another in the absence of an external electric field.
Draw a new energy diagram representing the final energy states after the two Fermi levels have equalized.
Note: Ef represents the Fermi energy level, and not a voltage. In physics, E always stands for energy and V for electric potential (voltage).
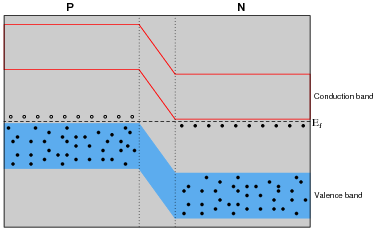
|
|
Electrons from the N-piece rushed over to fill holes in the P-piece in order to achieve a lower energy state and equalize the two Fermi levels. This displacement of charge carriers created an electric field which accounts for the sloped energy bands in the middle region.
Follow-up question: what is this middle region called?
Notes:
This is one of those concepts I just couldn't understand when I had no comprehension of the quantum nature of electrons. In the "planetary" atomic model, there is no reason whatsoever for electrons to move from the N-piece to the P-piece unless there was an electric field pushing them in that direction. And conversely, once an electric field was created by the imbalance of electrons, the free-wheeling planetary theory would have predicted that the electrons move right back where they came from in order to neutralize the field.
Once you grasp the significance of quantized energy states, and the principle that particles do not "hold on" to unnecessary energy and therefore remain in high states when they could move down to a lower level, the concept becomes much clearer.
Question 7:
Draw an energy diagram for a PN semiconductor junction under the influence of a reverse external voltage.
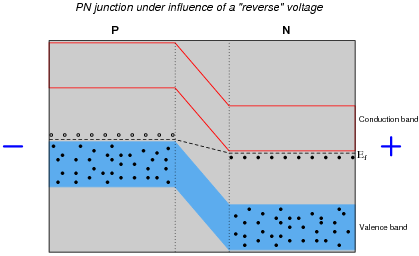
|
|
Note: Ef represents the Fermi energy level, and not a voltage. In physics, E always stands for energy and V for electric potential (voltage).
Notes:
Here it is very important that students understand the effects an electric field has on energy bands.
Question 8:
Draw an energy diagram for a PN semiconductor junction under the influence of a forward external voltage.
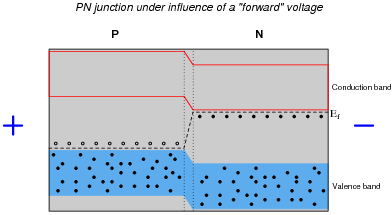
|
|
Note: Ef represents the Fermi energy level, and not a voltage. In physics, E always stands for energy and V for potential (voltage).
Notes:
Here it is very important that students understand the effects an electric field has on energy bands.
Question 9:
Draw an energy diagram for a PN semiconductor junction showing the motion of electrons and holes conducting an electric current.
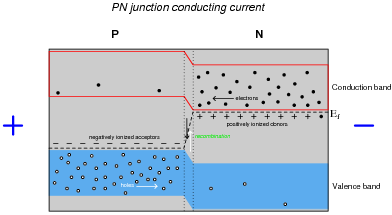
|
|
The "+" and "-" signs show the locations of ionized acceptor and donor atoms, having taken on electric charges to create valence-band holes and conduction-band electrons, respectively.
Note: Ef represents the Fermi energy level, and not a voltage. In physics, E always stands for energy and V for potential (voltage).
Notes:
Students will probably ask why there are a few holes shown in the N-type valence band, and why there are a few electrons in the P-type conduction band. Let them know that just because N-type materials are specifically designed to have conduction-band electrons does not mean they are completely devoid of valence-band holes, and visa-versa! What your students see here are minority carriers.
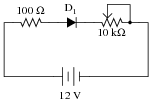
Question 10:
Is this diode forward-biased or reverse biased?

|
|
Question 11:
Insert a diode into this circuit schematic in the correct direction to make it forward-biased by the battery voltage:

|
|

Question 12:
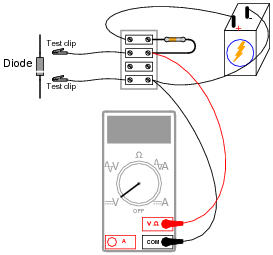
Most introductory textbooks will tell you that a silicon PN junction drops 0.7 volts when forward-biased, and a germanium PN junction drops 0.3 volts when forward biased. Design a circuit that tests the "forward voltage" (VF) of a PN-junction diode, so you may measure the voltage yourself, without the use of a special diode-testing meter.
|
|
Notes:
Ask your students how they would determine the size of resistor to use for this "diode test" circuit. Would be permissible to use any arbitrary value of resistor, or does the value matter significantly?
Question 13:
If a semiconductor PN junction is reverse-biased, ideally no continuous current will go through it. However, in real life there will be a small amount of reverse-bias current that goes through the junction. How is this possible? What allows this reverse current to flow?
Notes:
Review with your students what "minority carriers" are, and apply this concept to the PN junction. Trace the motions of these minority carriers, and compare them with the motions of majority carriers in a forward-biased PN junction.
Question 14:
Shockley's diode equation in standard form is quite lengthy, but it may be considerably simplified for conditions of room temperature. Note that if the temperature (T) is assumed to be room temperature (25o C), there are three constants in the equation that are the same for all PN junctions: T, k, and q.
|
The quantity [kT/q] is known as the thermal voltage of the junction. Calculate the value of this thermal voltage, given a room temperature of 25o C. Then, substitute this quantity into the original "diode formula" so as to simplify its appearance.
|
Notes:
Of course, students will have to research the difference between degrees Kelvin and degrees Celsius to successfully calculate the thermal voltage for the junction. They will also have to figure out how to substitute this figure in place of q, k, and T in the original equation. The latter step will be difficult for students not strong in algebra skills.
For those students, I would suggest posing the following question to get them thinking properly about algebraic substitution. Suppose we had the formula y = x[ab/cd], and we knew that [b/c] could be written as m. How would we substitute m into the original equation? Answer: y = x[am/d].
Question 15:
A student sets up a circuit that looks like this, to gather data for characterizing a diode:
|
|
Measuring diode voltage and diode current in this circuit, the student generates the following table of data:
-
Vdiode Idiode
0.600 V 1.68 mA
0.625 V 2.88 mA
0.650 V 5.00 mA
0.675 V 8.68 mA
0.700 V 14.75 mA
0.725 V 27.25 mA
0.750 V 48.2 mA
This student knows that the behavior of a PN junction follows Shockley's diode equation, and that the equation may be simplified to the following form:
|
Where,
K = a constant incorporating both the thermal voltage and the nonideality coefficient
The goal of this experiment is to calculate K and IS, so that the diode's current may be predicted for any arbitrary value of voltage drop. However, the equation must be simplified a bit before the student can proceed.
At substantial levels of current, the exponential term is very much larger than unity (e[(Vdiode)/K] >> 1), so the equation may be simplified as such:
|
From this equation, determine how the student would calculate K and IS from the data shown in the table. Also, explain how this student may verify the accuracy of these calculated values.
IS � 2.869 nA
Hint: this may be a difficult problem to solve if you are unfamiliar with the algebraic technique of dividing one equation by another. Here is the technique shown in general terms:
|
|
From here, it may be possible to perform simplifications impossible before. I suggest using this technique to solve for K first.
Follow-up question: explain how this student knew it was ßafe" to simplify the Shockley diode equation by eliminating the "- 1" term. Is this sort of elimination always permissible? Why or why not?
Notes:
The algebraic technique used to solve for K is very useful for certain types of problems.
Discuss the follow-up question with your students. It is important in the realm of technical mathematics to have a good sense of the relative values of equation terms, so that one may ßafely" eliminate terms as a simplifying technique without incurring significant errors. In the Shockley diode equation it is easy to show that the exponential term is enormous compared to 1 for the values of Vdiode shown in the table (assuming a typical value for thermal voltage), and so the "- 1" part is very safe to eliminate.
Also discuss the idea of verifying the calculated values of K and IS with your students, to help them cultivate a scientifically critical point of view in their study of electronics.
Incidentally, the data in this table came from a real experiment, set up exactly as shown by the schematic diagram in the question. Care was taken to avoid diode heating by turning the potentiometer to maximum resistance between readings.
Question 16:
In order to simplify analysis of circuits containing PN junctions, a ßtandard" forward voltage drop is assumed for any conducting junction, the exact figure depending on the type of semiconductor material the junction is made of.
How much voltage is assumed to be dropped across a conducting silicon PN junction? How much voltage is assumed for a forward-biased germanium PN junction? Identify some factors that cause the real forward voltage drop of a PN junction to deviate from its ßtandard" figure.
Temperature, current, and doping concentration all affect the forward voltage drop of a PN junction.
Notes:
I've seen too many students gain the false impression that silicon PN junctions always drop 0.7 volts, no matter what the conditions. This "fact" is emphasized so strongly in many textbooks that students usually don't think to ask when they measure a diode's forward voltage drop and find it to be considerably different than 0.7 volts! It is very important that students realize this figure is an approximation only, used for the sake of (greatly) simplifying junction semiconductor circuit analysis.
Question 17:
|
�f(x) dx Calculus alert! |
This is not to say that we cannot assign a dynamic value of resistance to a PN junction, though. The fundamental definition of resistance comes from Ohm's Law, and it is expressed in derivative form as such:
|
The fundamental equation relating current and voltage together for a PN junction is Shockley's diode equation:
|
At room temperature (approximately 21 degrees C, or 294 degrees K), the thermal voltage of a PN junction is about 25 millivolts. Substituting 1 for the nonideality coefficient, we may simply the diode equation as such:
|
Differentiate this equation with respect to V, so as to determine [dI/dV], and then reciprocate to find a mathematical definition for dynamic resistance ([dV/dI]) of a PN junction. Hints: saturation current (IS) is a very small constant for most diodes, and the final equation should express dynamic resistance in terms of thermal voltage (25 mV) and diode current (I).
|
Notes:
The result of this derivation is important in the analysis of certain transistor amplifiers, where the dynamic resistance of the base-emitter PN junction is significant to bias and gain approximations. I show the solution steps for you here because it is a neat application of differentiation (and substitution) to solve a real-world problem:
|
|
|
Now, we manipulate the original equation to obtain a definition for IS e40 V in terms of current, for the sake of substitution:
|
|
|
Substituting this expression into the derivative:
|
Reciprocating to get voltage over current (the proper form for resistance):
|
Now we may get rid of the saturation current term, because it is negligibly small:
|
|
The constant of 25 millivolts is not set in stone, by any means. Its value varies with temperature, and is sometimes given as 26 millivolts or even 30 millivolts.
Question 18:
Measure the forward voltage drop of a silicon rectifying diode, such as a model 1N4001. How close is the measured forward voltage drop to the ïdeal" figure usually assumed for silicon PN junctions? What happens when you increase the temperature of the diode by holding on to it with your fingers? What happens when you decrease the temperature of the diode by touching an ice cube to it?
Notes:
Diodes are quite temperature-sensitive, so this experiment will be very easy to conduct. You may not have ice available in your classroom, but that's okay. Your students should realize that experiments such as this are perfectly fair to perform at home, where they probably do have access to ice.
Question 19:
The nonconducting depletion region of a PN junction forms a parasitic capacitance between the P and the N semiconductor region. Does the capacitance increase or decrease as a greater reverse-bias voltage is applied to the PN junction? Explain your answer.
Challenge question: can you think of any practical applications for this variable-capacitance effect?
Notes:
This question is a good review of capacitor theory, and also an opportunity to introduce a special kind of diode: the varactor.