Home » Circuits
Car Headlights Timer Circuit Schematic
Pushbutton activated, Very simple circuitry
This device is a simple timer, allowing to keep on the headlights of your vehicle for about 1min. and 30sec., e.g. when accessing some dark place, without the necessity of coming back to switch-off the lights. Pushing on P1 allows C1 charging to full 12V battery supply. Therefore Q1 is driven hard-on, driving in turn Q2 and its Relay load. The headlights are thus activated by means of the Relay contact wired in parallel to the vehicle's headlights switch. RL1 remains activated until C1 is almost fully discharged, i.e.
When its voltage falls below about 0.7V. The timing delay of the circuit depends by C1 and R1 values and was set to about 1min. and 30sec. In practice, due to electrolytic capacitors wide tolerance value, this delay will vary from about 1min. and 30sec. to 1min. and 50sec. An interesting variation is to use the inside lamp as a command source for the timer. In this way, when the door is opened C1 is charged, but it will start to discharge only when the door will be closed, substituting pushbutton operation. To enable the circuit acting in this way, simply connect the cathode of a 1N4002 diode to R1-C1 junction and the anode to the "live" lead of the inside lamp. This lead can be singled-out using a voltmeter, as it is the lead where a 12V voltage can be measured in respect to the vehicle frame when the lamp is on.
Circuit diagram:
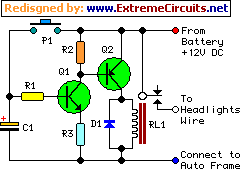
R1 = 4.7K - 1/4W Resistor
R2 = 1K - 1/4W Resistors
R3 = 1K - 1/4W Resistors
C1 = 100µF - 25V Electrolytic Capacitor (See Notes)
D1 = 1N4002 - 100V 1A Diode
Q1 = BC547 - 45V 100mA NPN Transistor
Q2 = BC327 - 45V 800mA PNP Transistor
P1 = SPST Pushbutton
RL1 = Relay with SPDT 10A min. switch
Coil Voltage 12V. Coil resistance 150-600 Ohms
Notes:
- The Relay contact must be rated at 10A or more.
- Time-delays obtained trying different tolerance electrolytic capacitors for C1:
- 100µF = 1'30" to 1'50"
- 47µF = 0'45" to 1'05"
- 220µF = 3'15" to 4'15"